
Your Cart is Empty
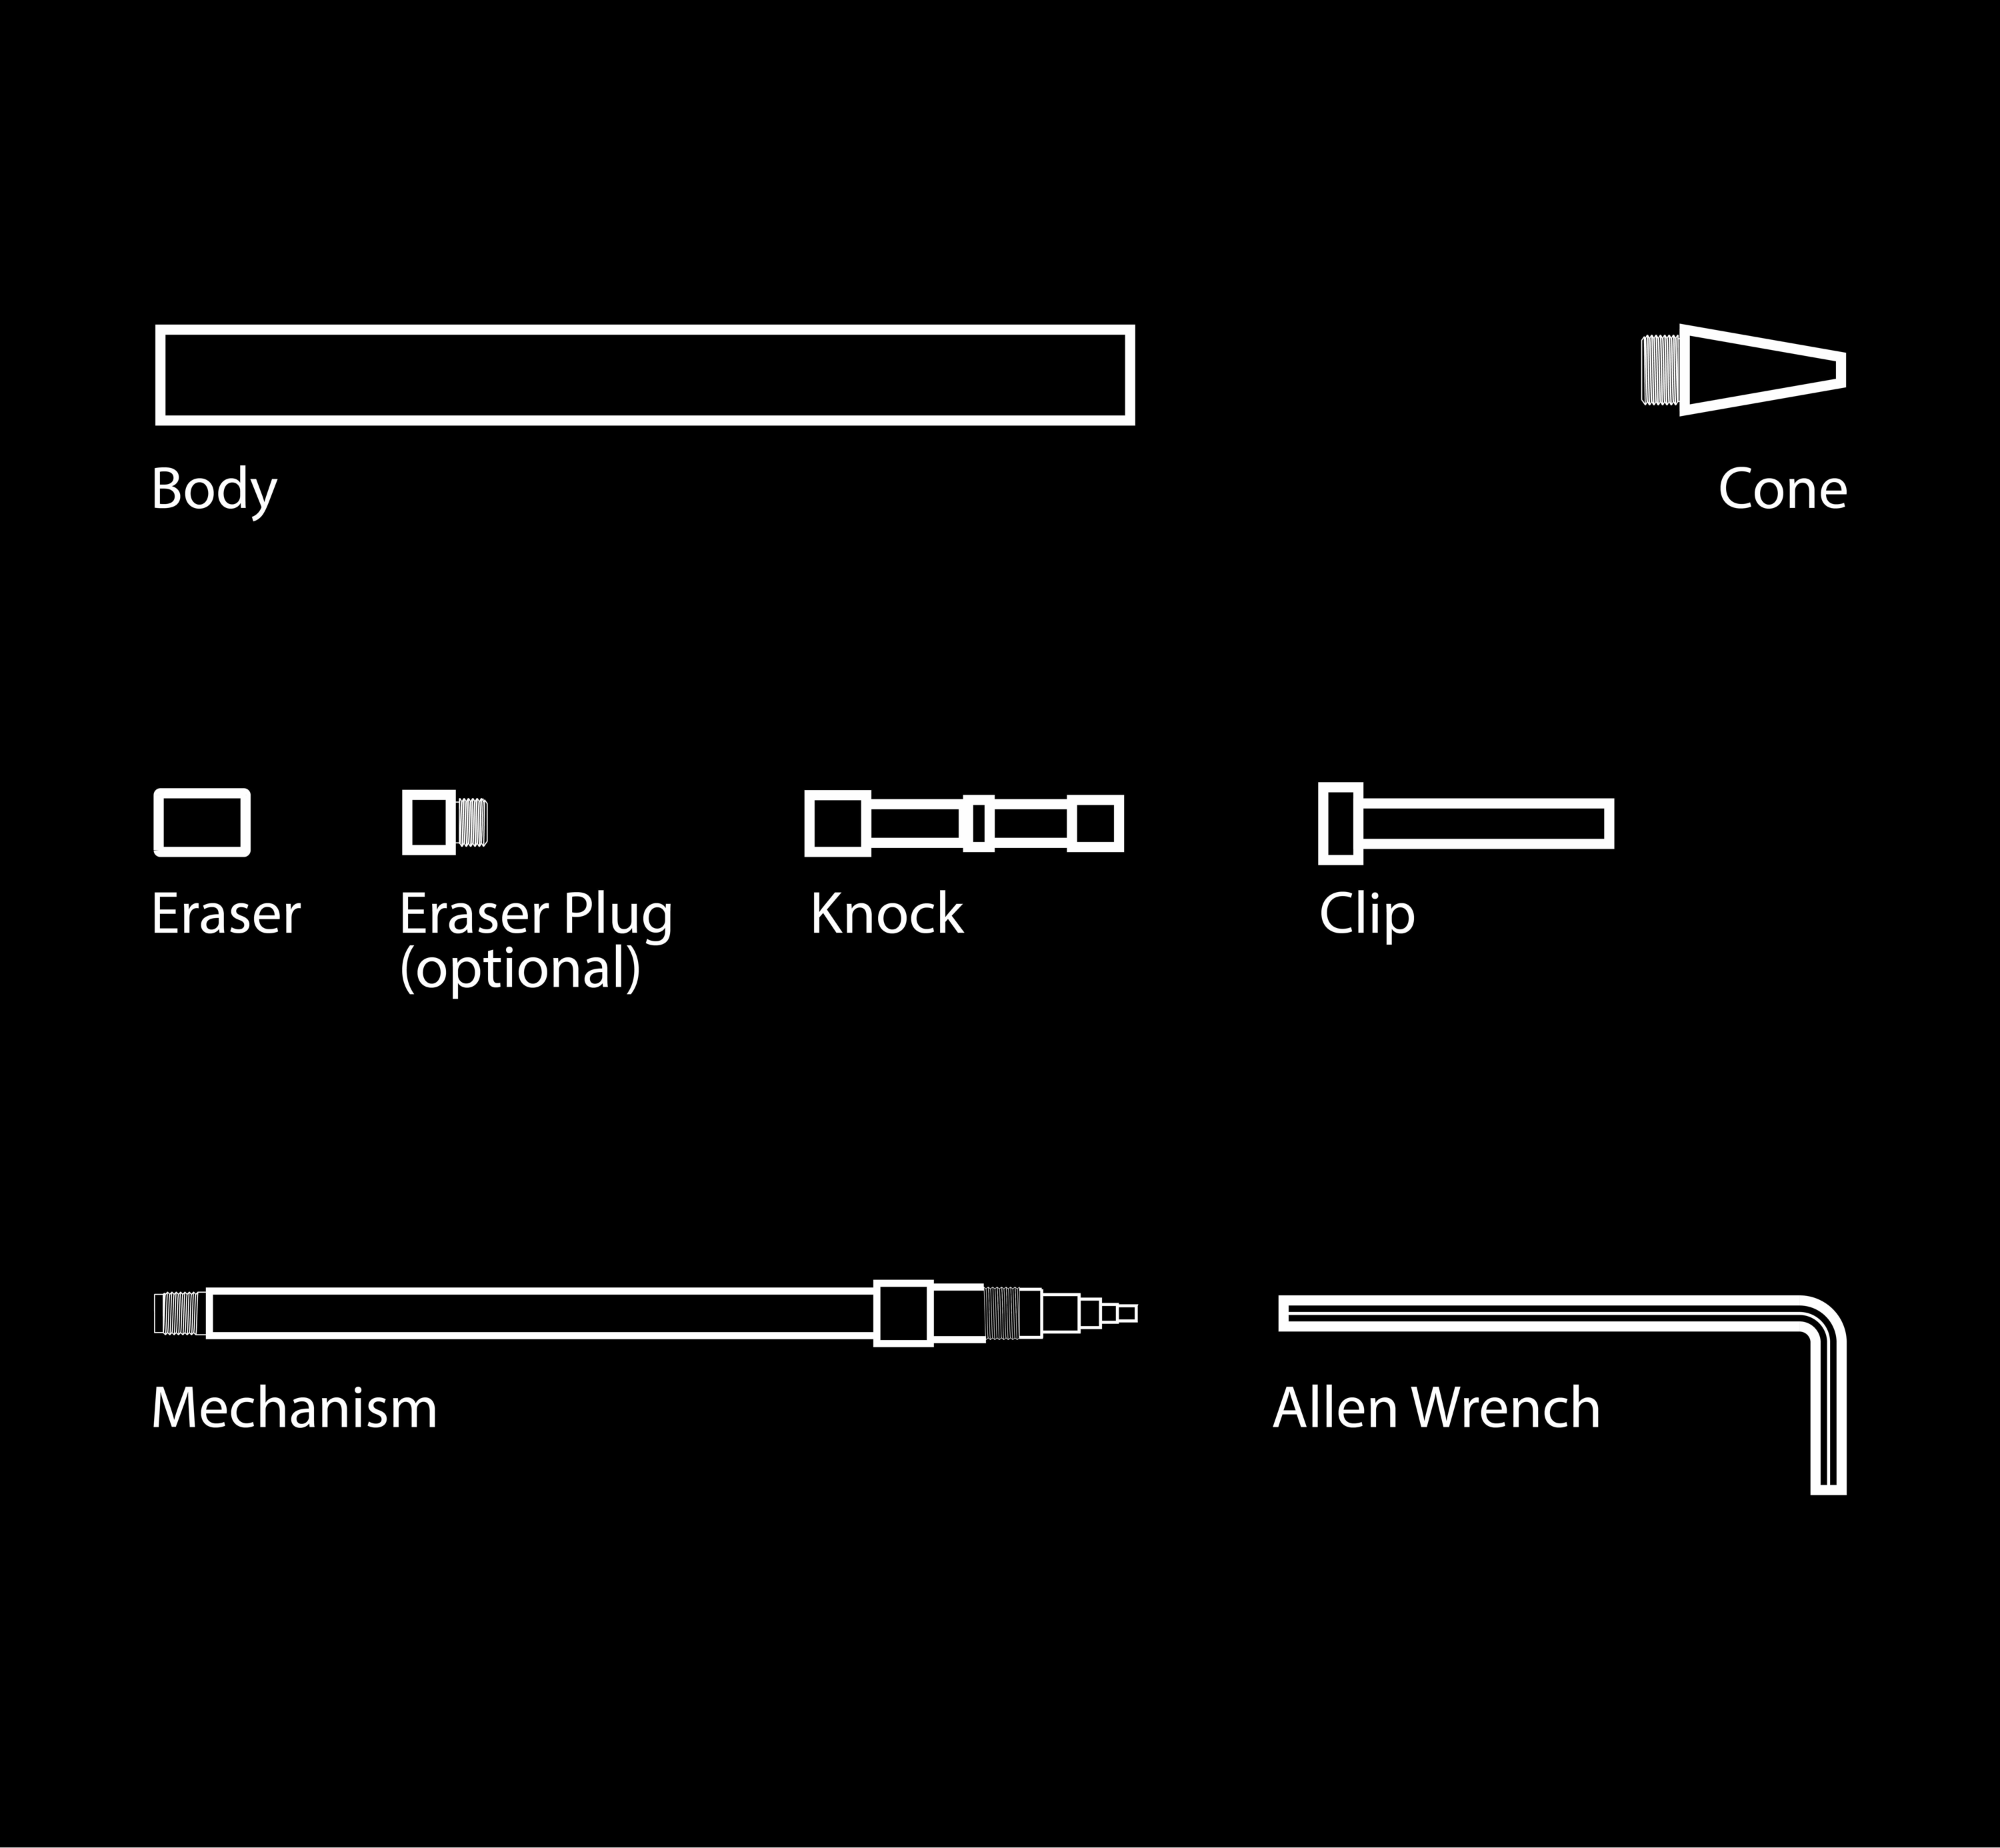
Thank you for using our Modern Fuel Click Pencil. It is a precision writing instrument that has been manufactured to the highest quality standards and we hope that it will provide you many years of optimal use. Your Modern Fuel writing instrument is unique in that its cone and body will only ever match with each other due to the custom-finish process used during the manufacturing process.
For your convenience, we have included written instructions with diagrams below, as well as videos showing how to do the same procedures. Most issues with our writing instruments can be solved quickly using the steps outlined below. Rarely, a manufacturing defect may present itself and necessitate a warranty replacement. See the information below for submitting a request for warranty service.
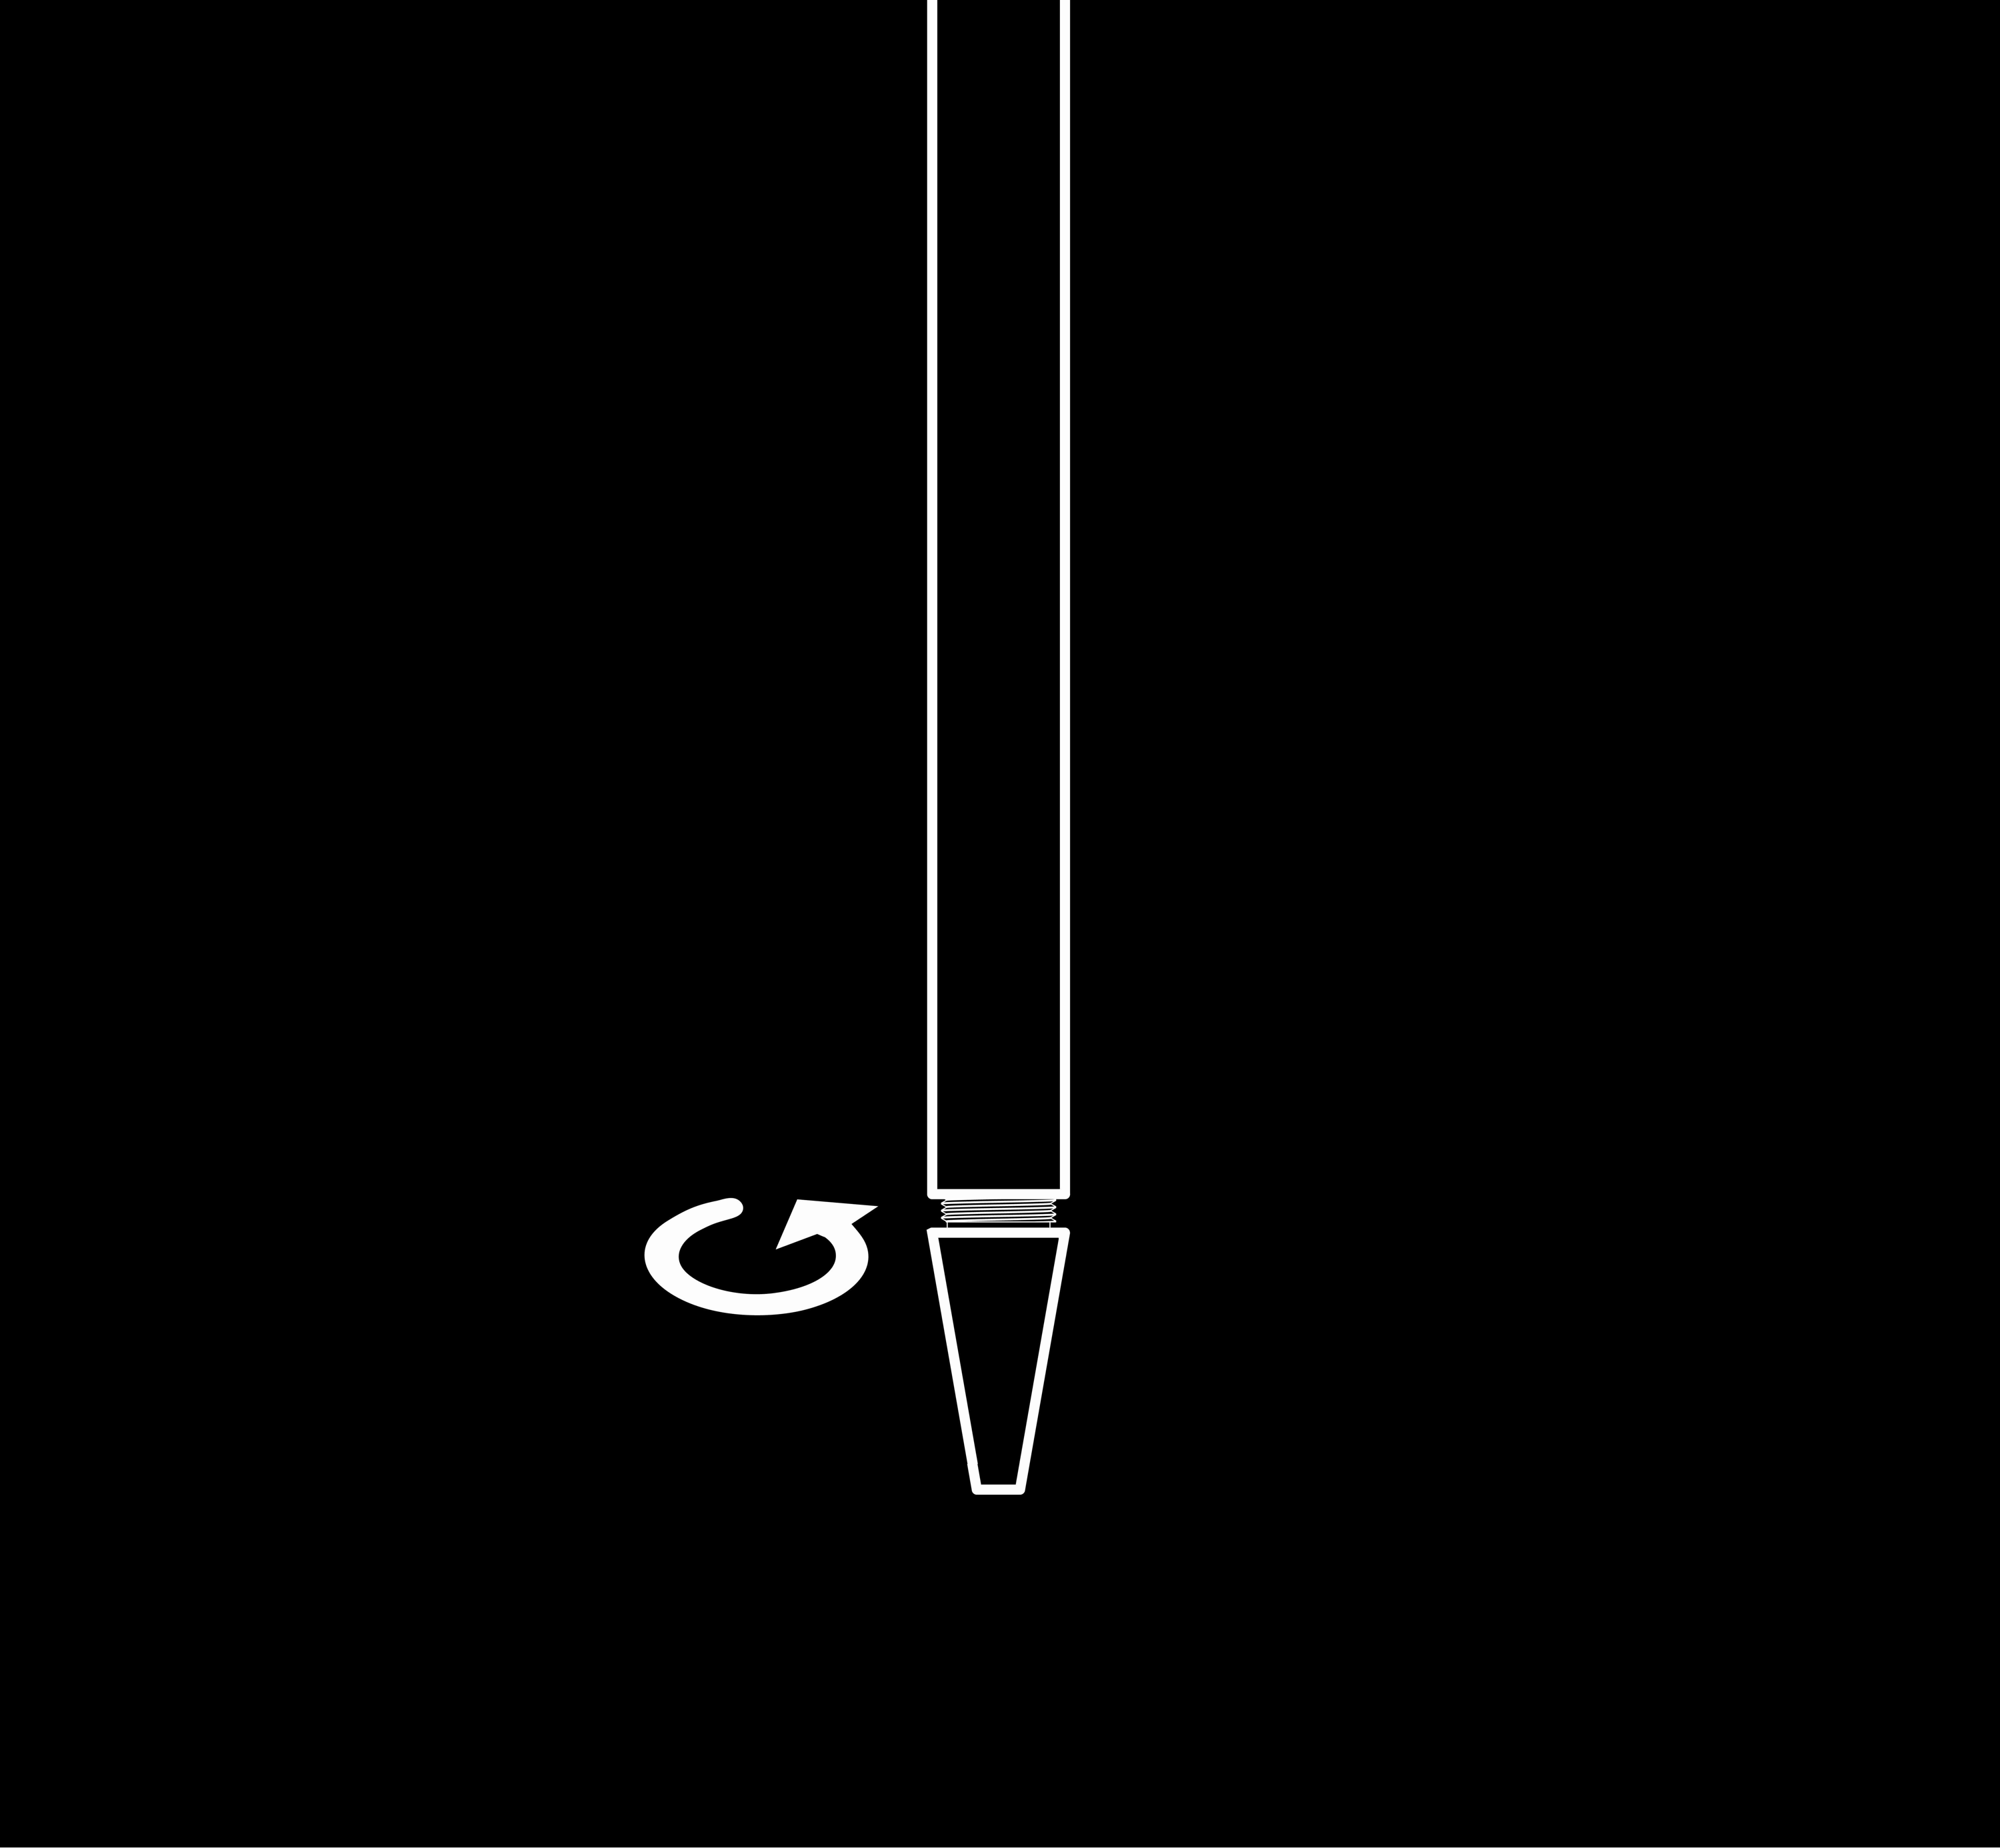
1. Remove the eraser (or unscrew the eraser plug, if installed)
2. Add the appropriate sized graphite
3. Re-insert the eraser or eraser plug, as desired
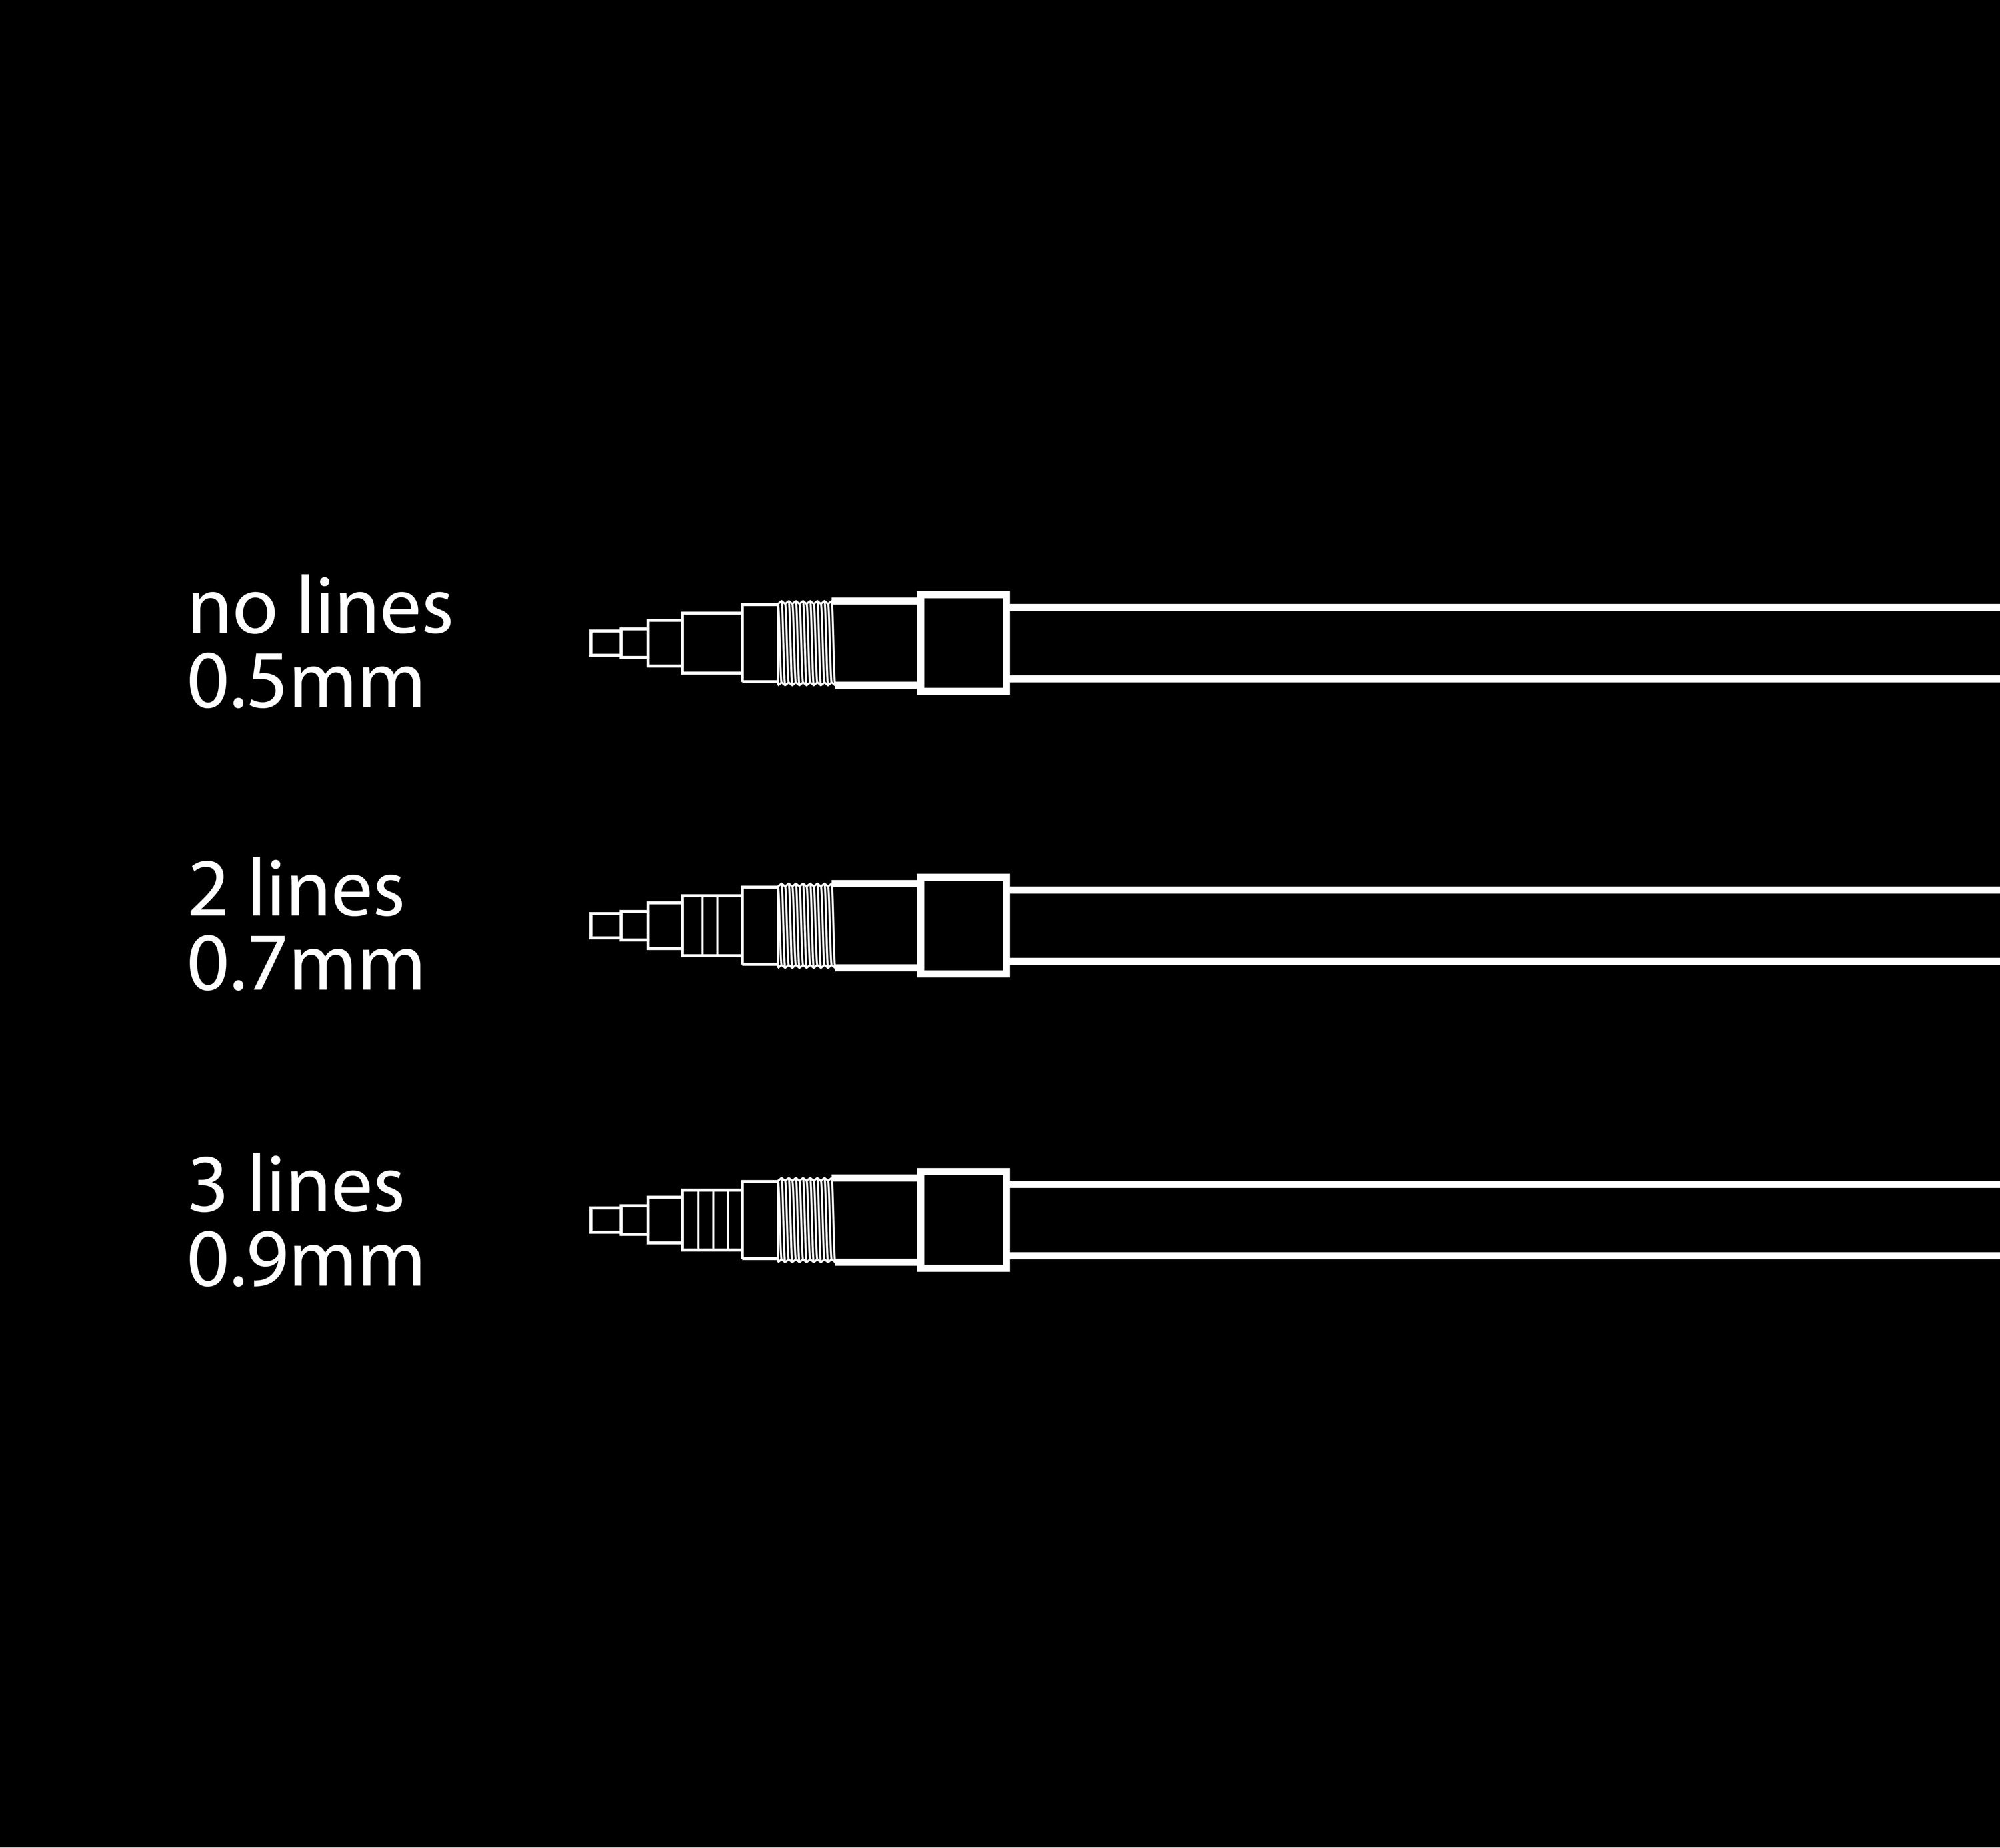
The pencil mechanisms can be identified by looking at the cone and reviewing the number of lines. For the bolt action mechanical pencil, the identifying markings are as follows:
3 lines - 0.9mm
2 lines - 0.7mm
No line - 0.5mm
The pencil can be disassembled to change the mechanism or for cleaning as necessary using the following steps:
1. Remove the eraser (or unscrew the eraser plug, if installed)
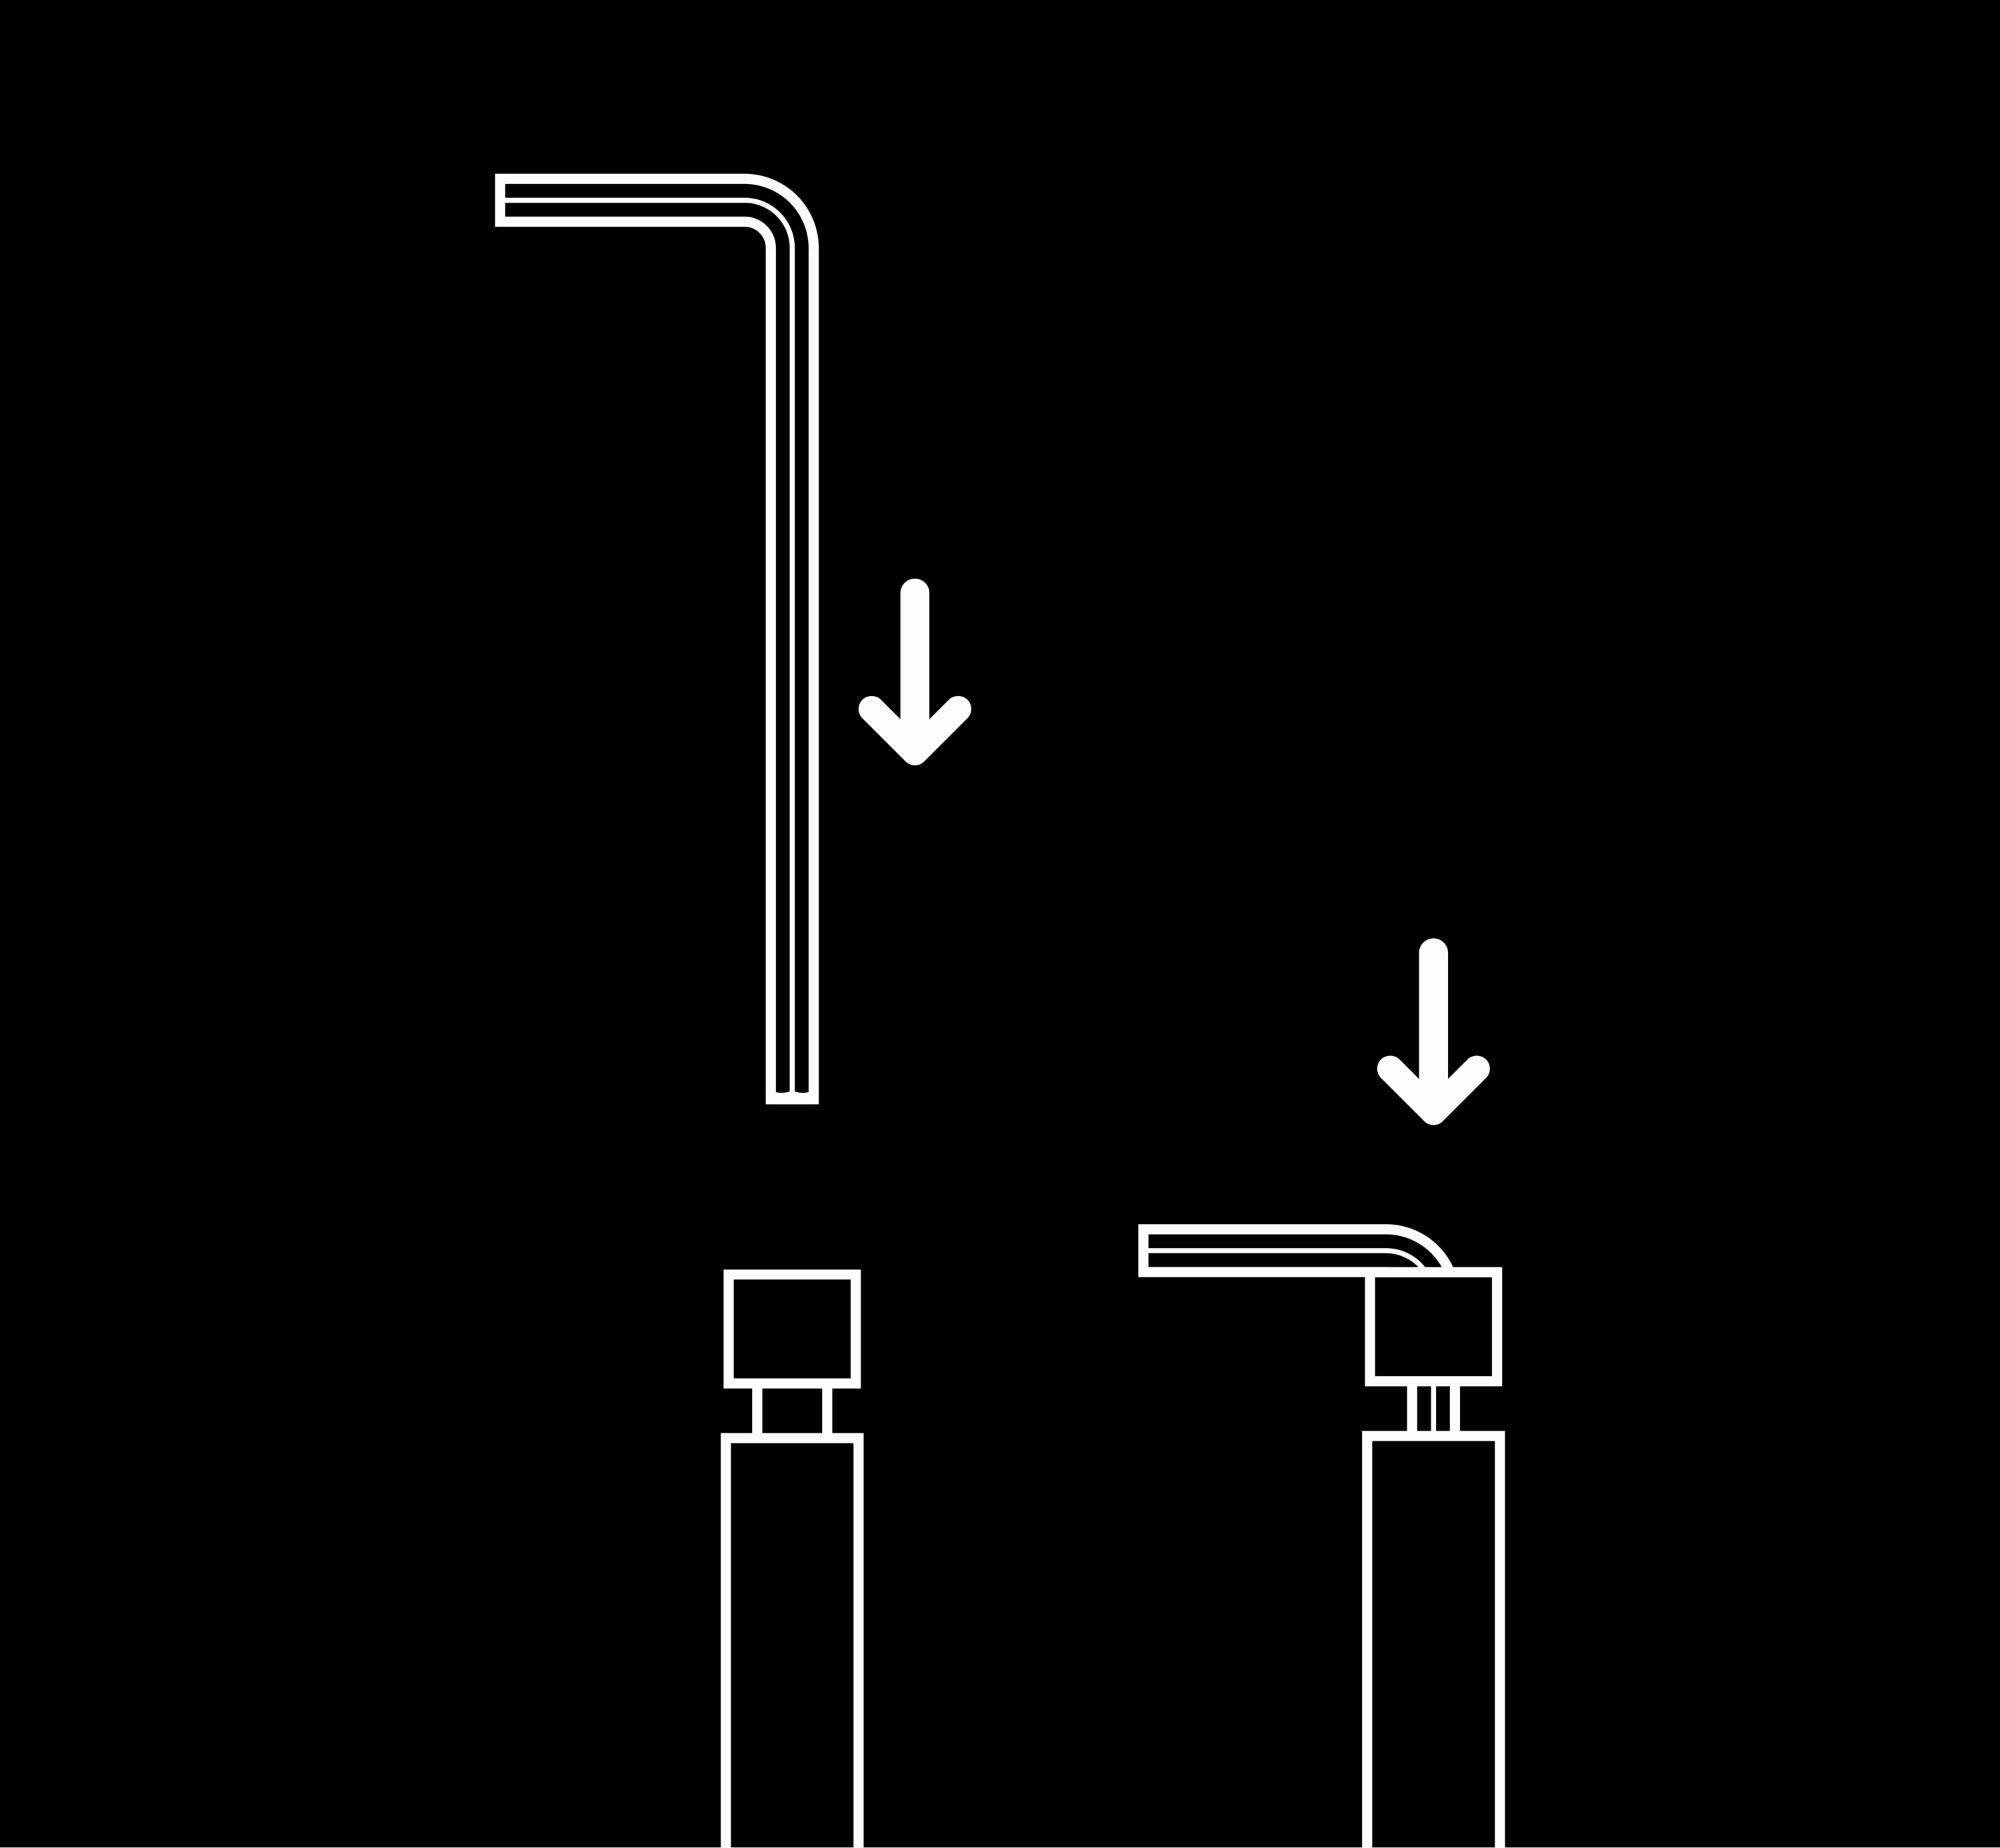
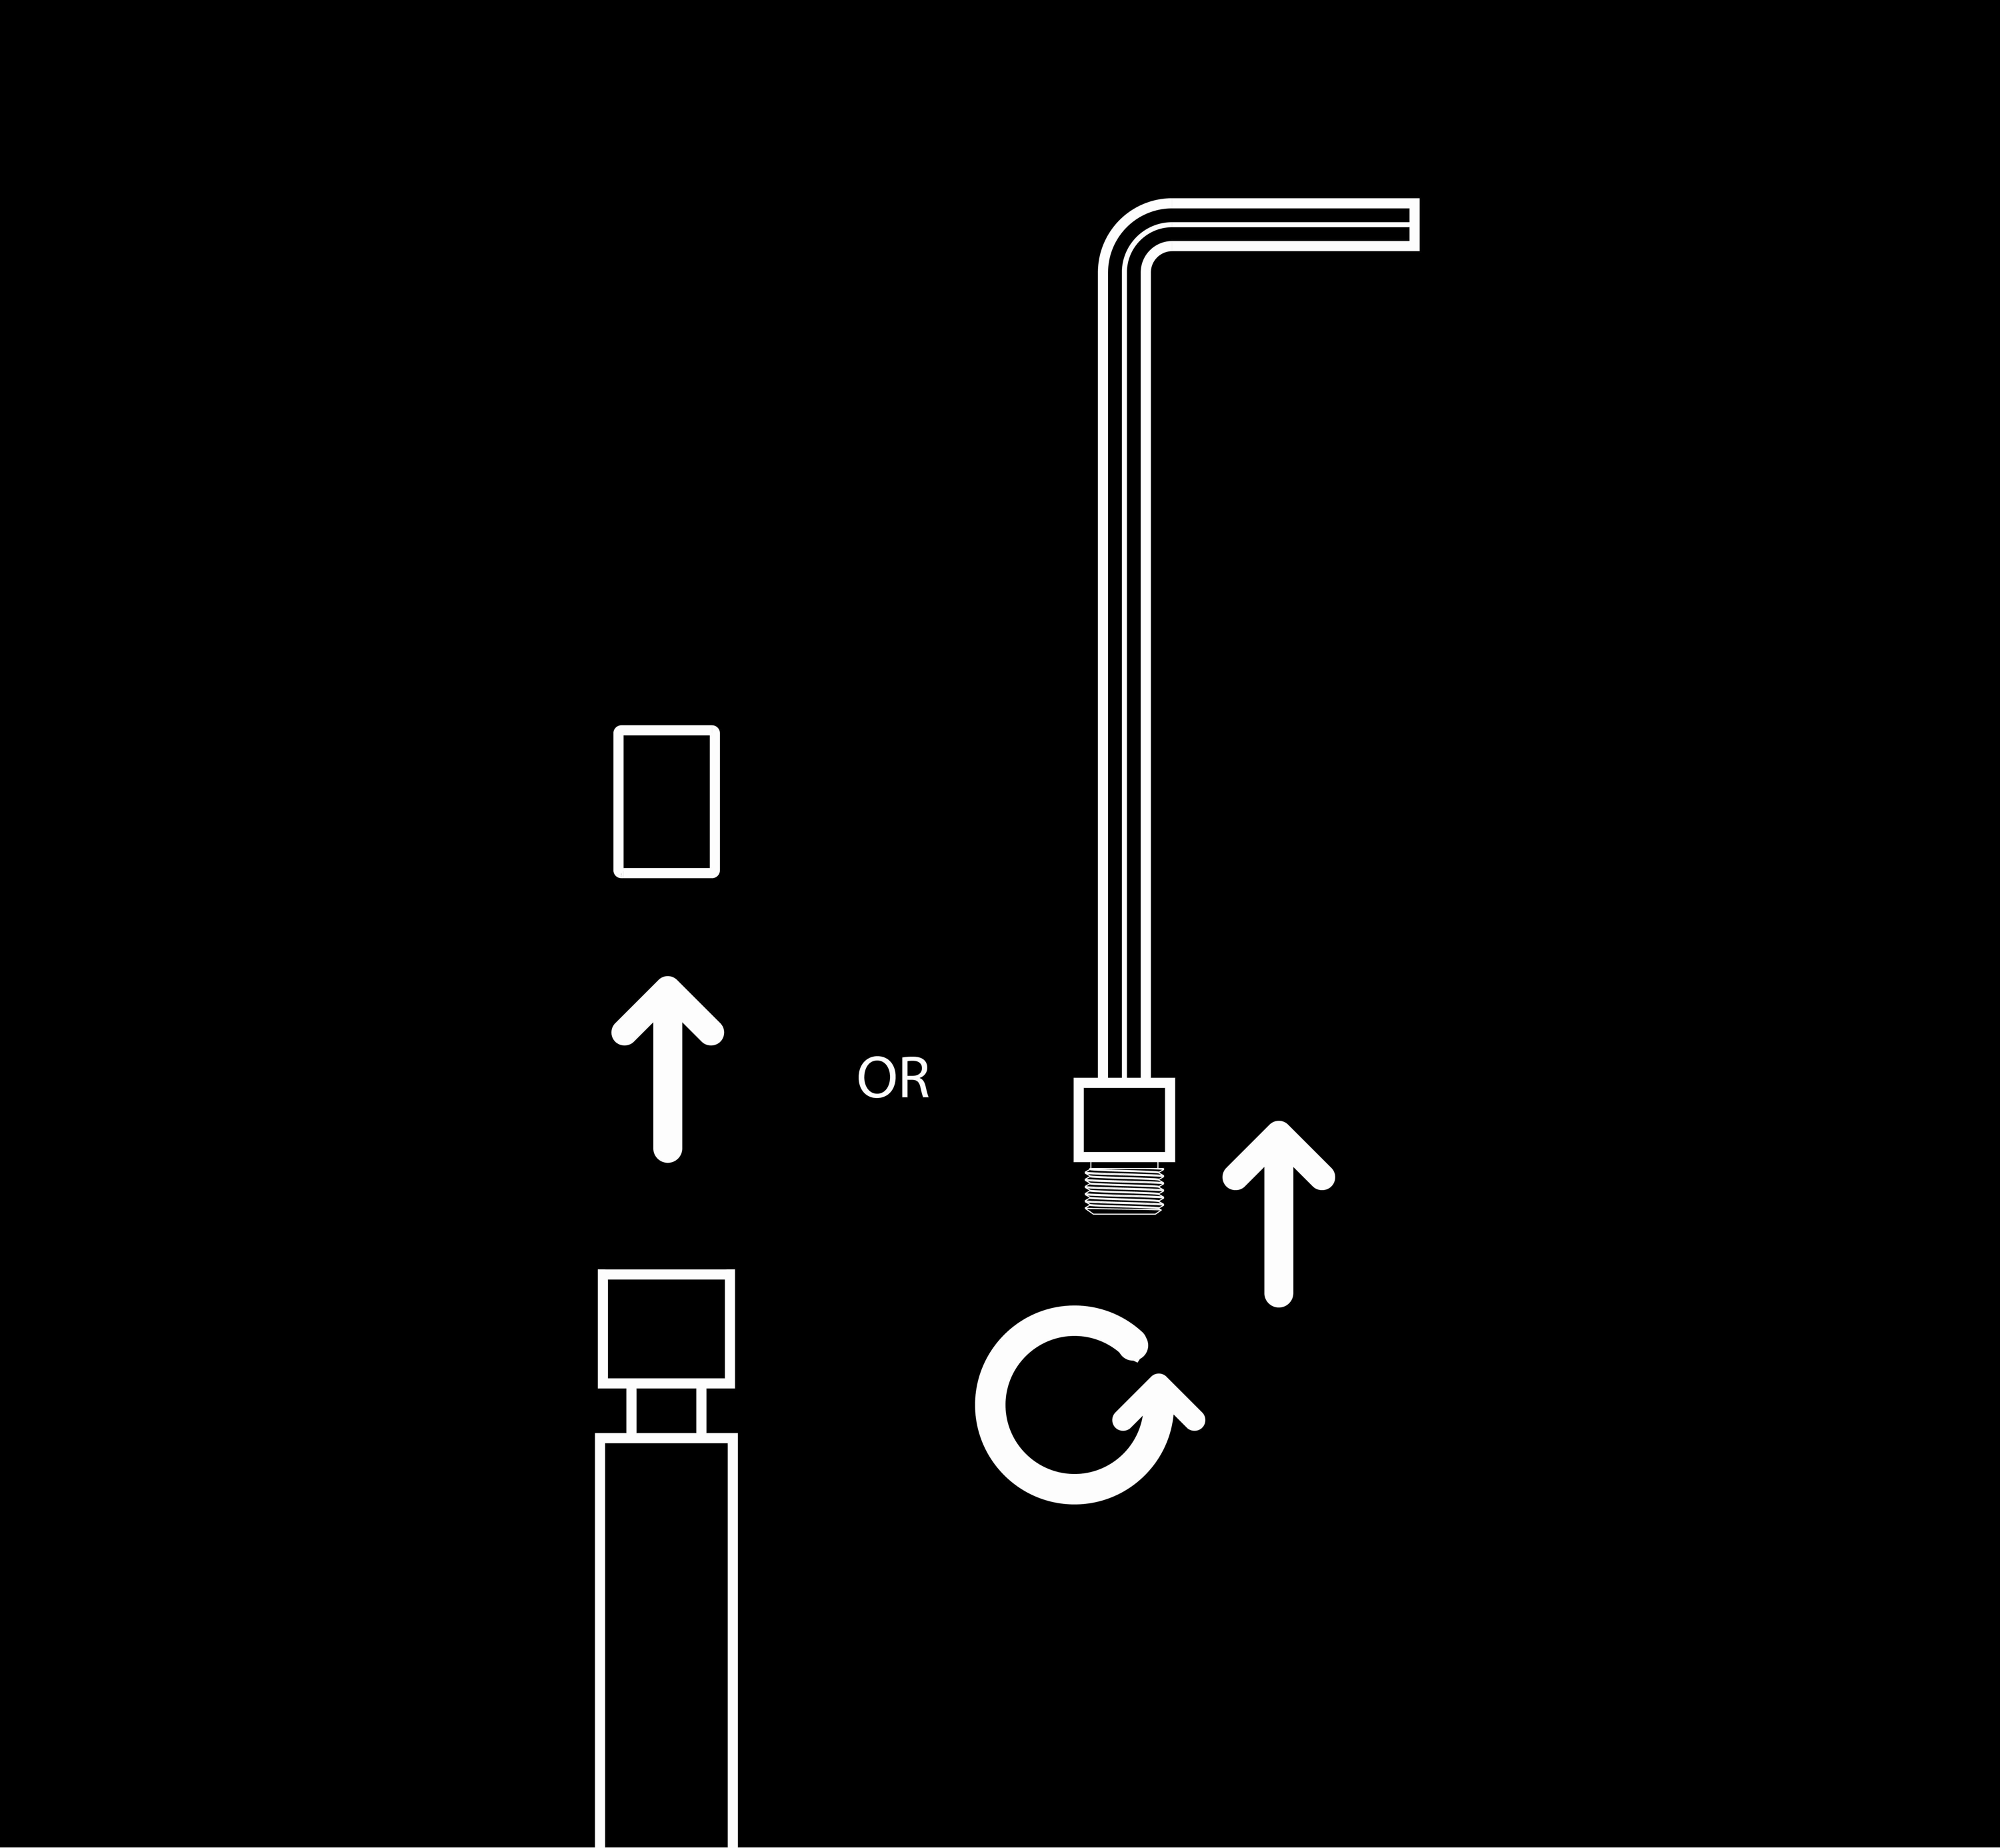
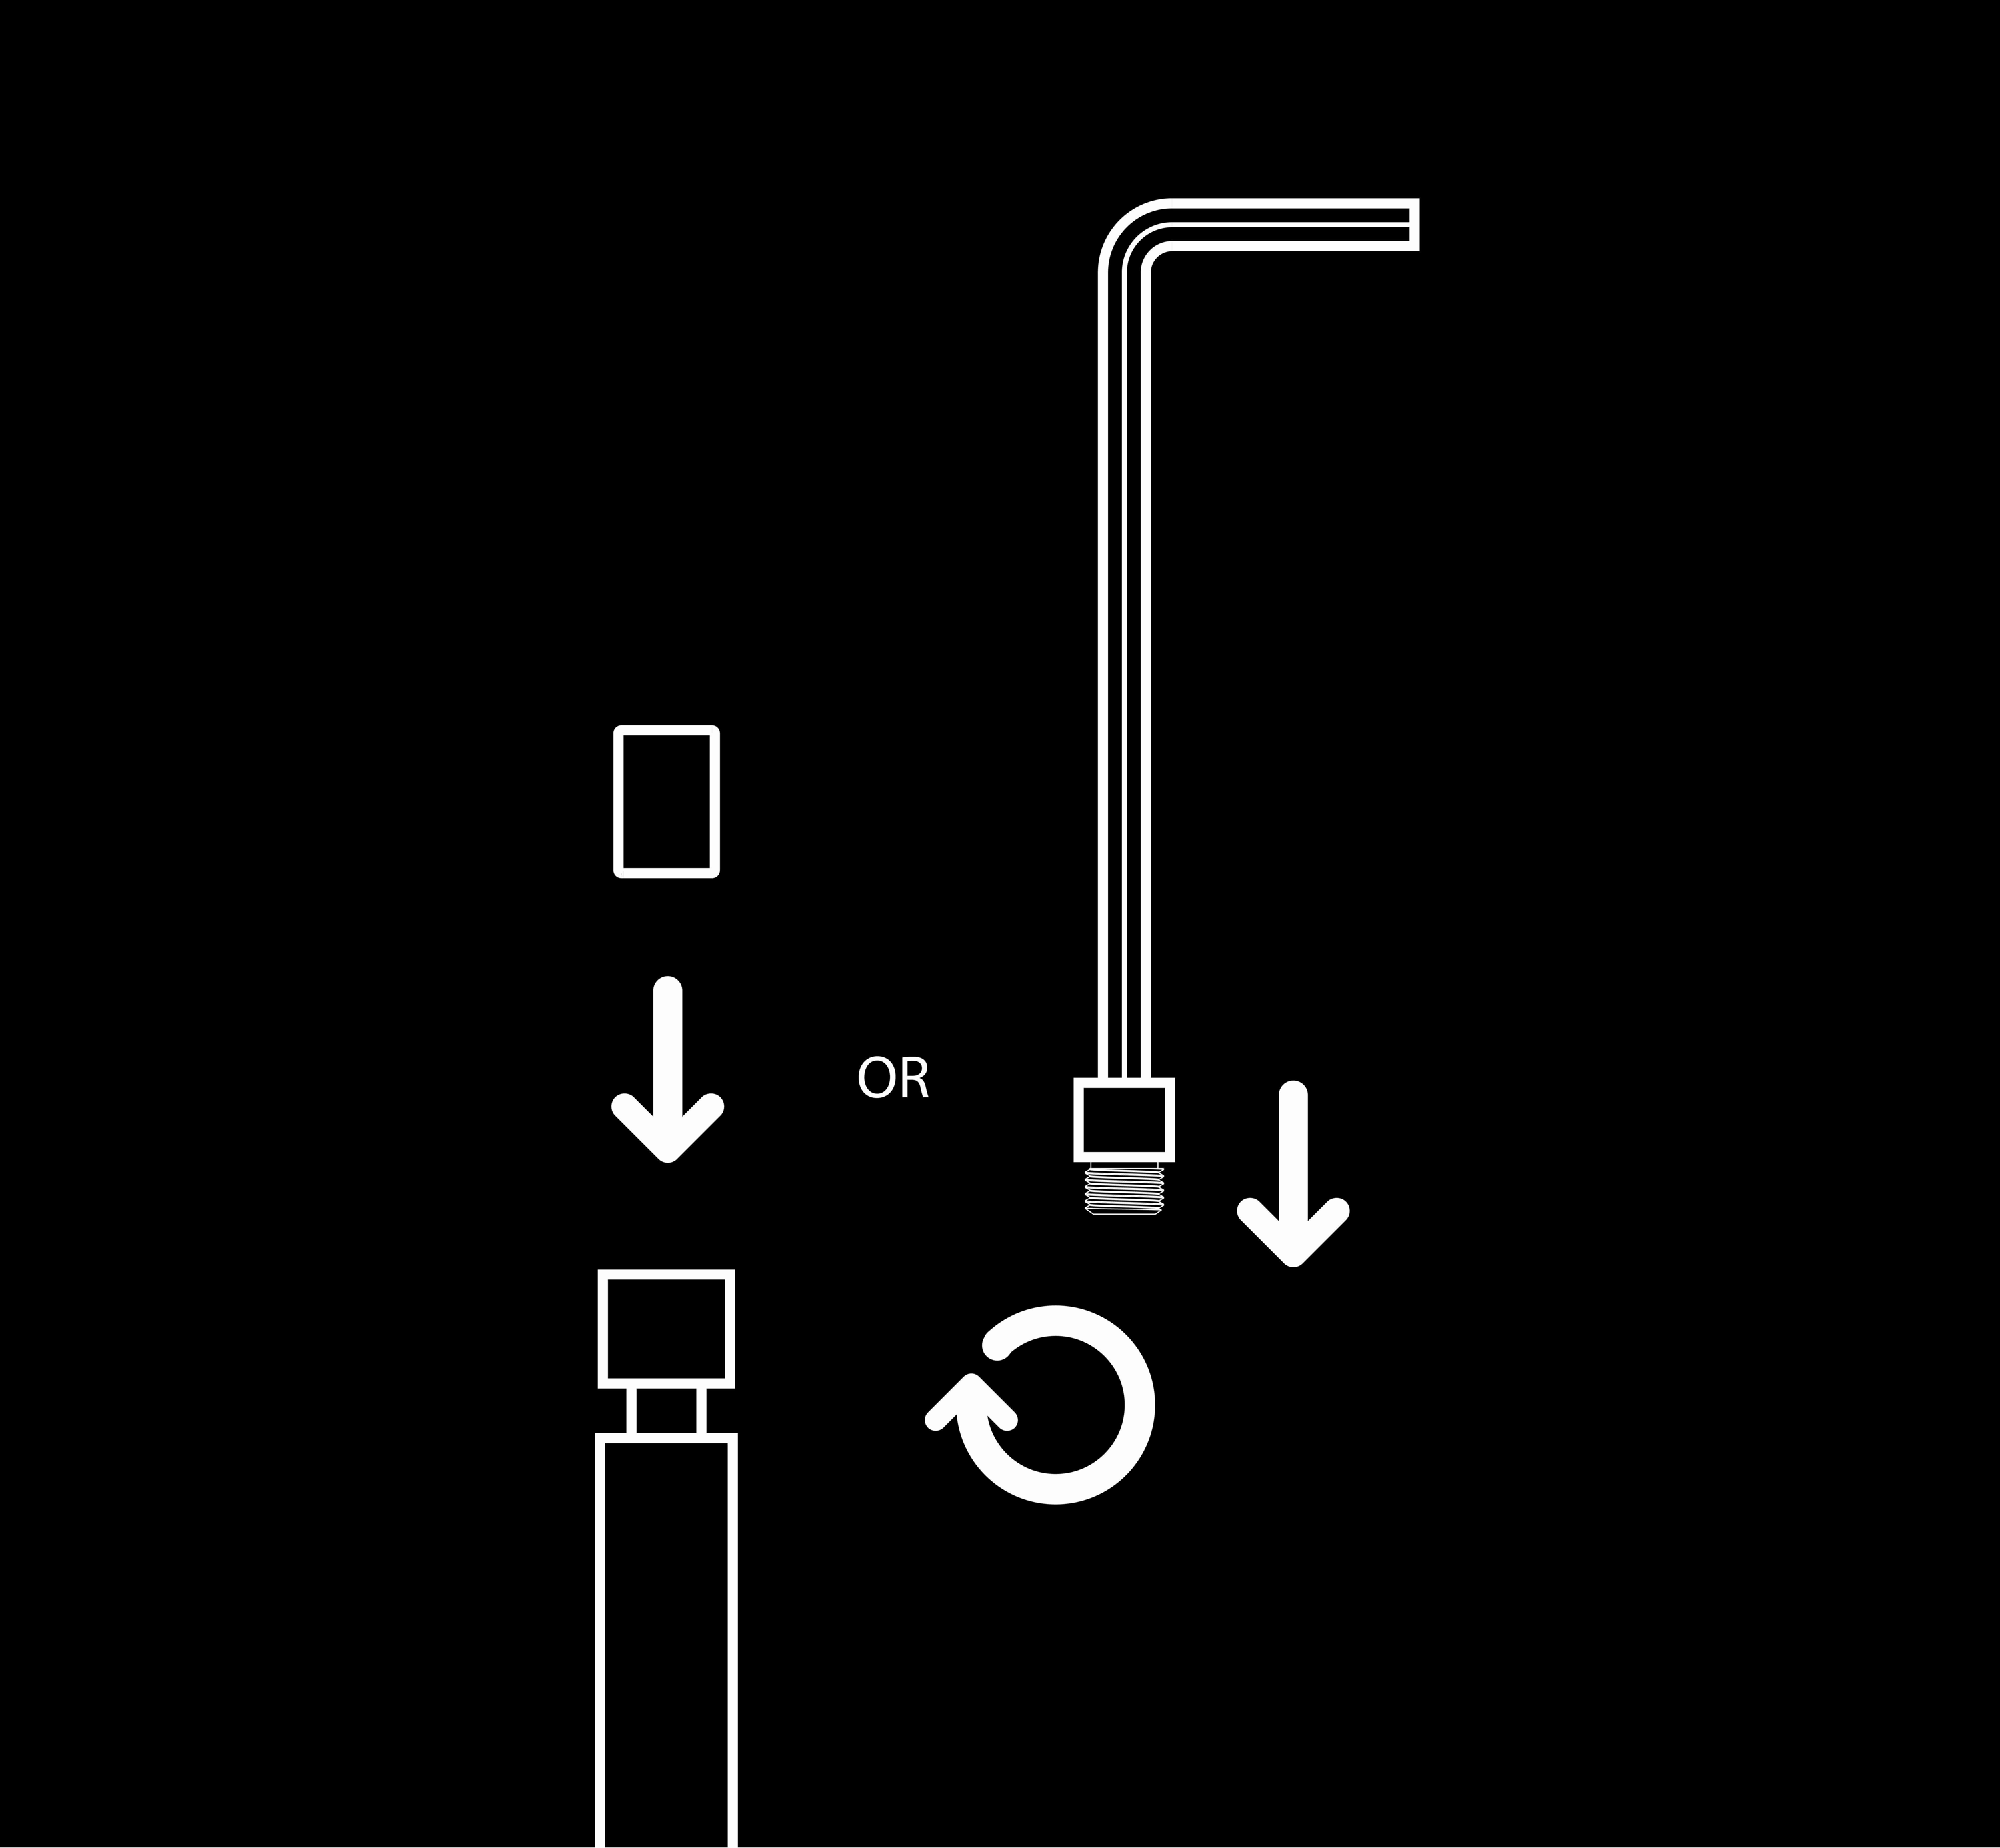
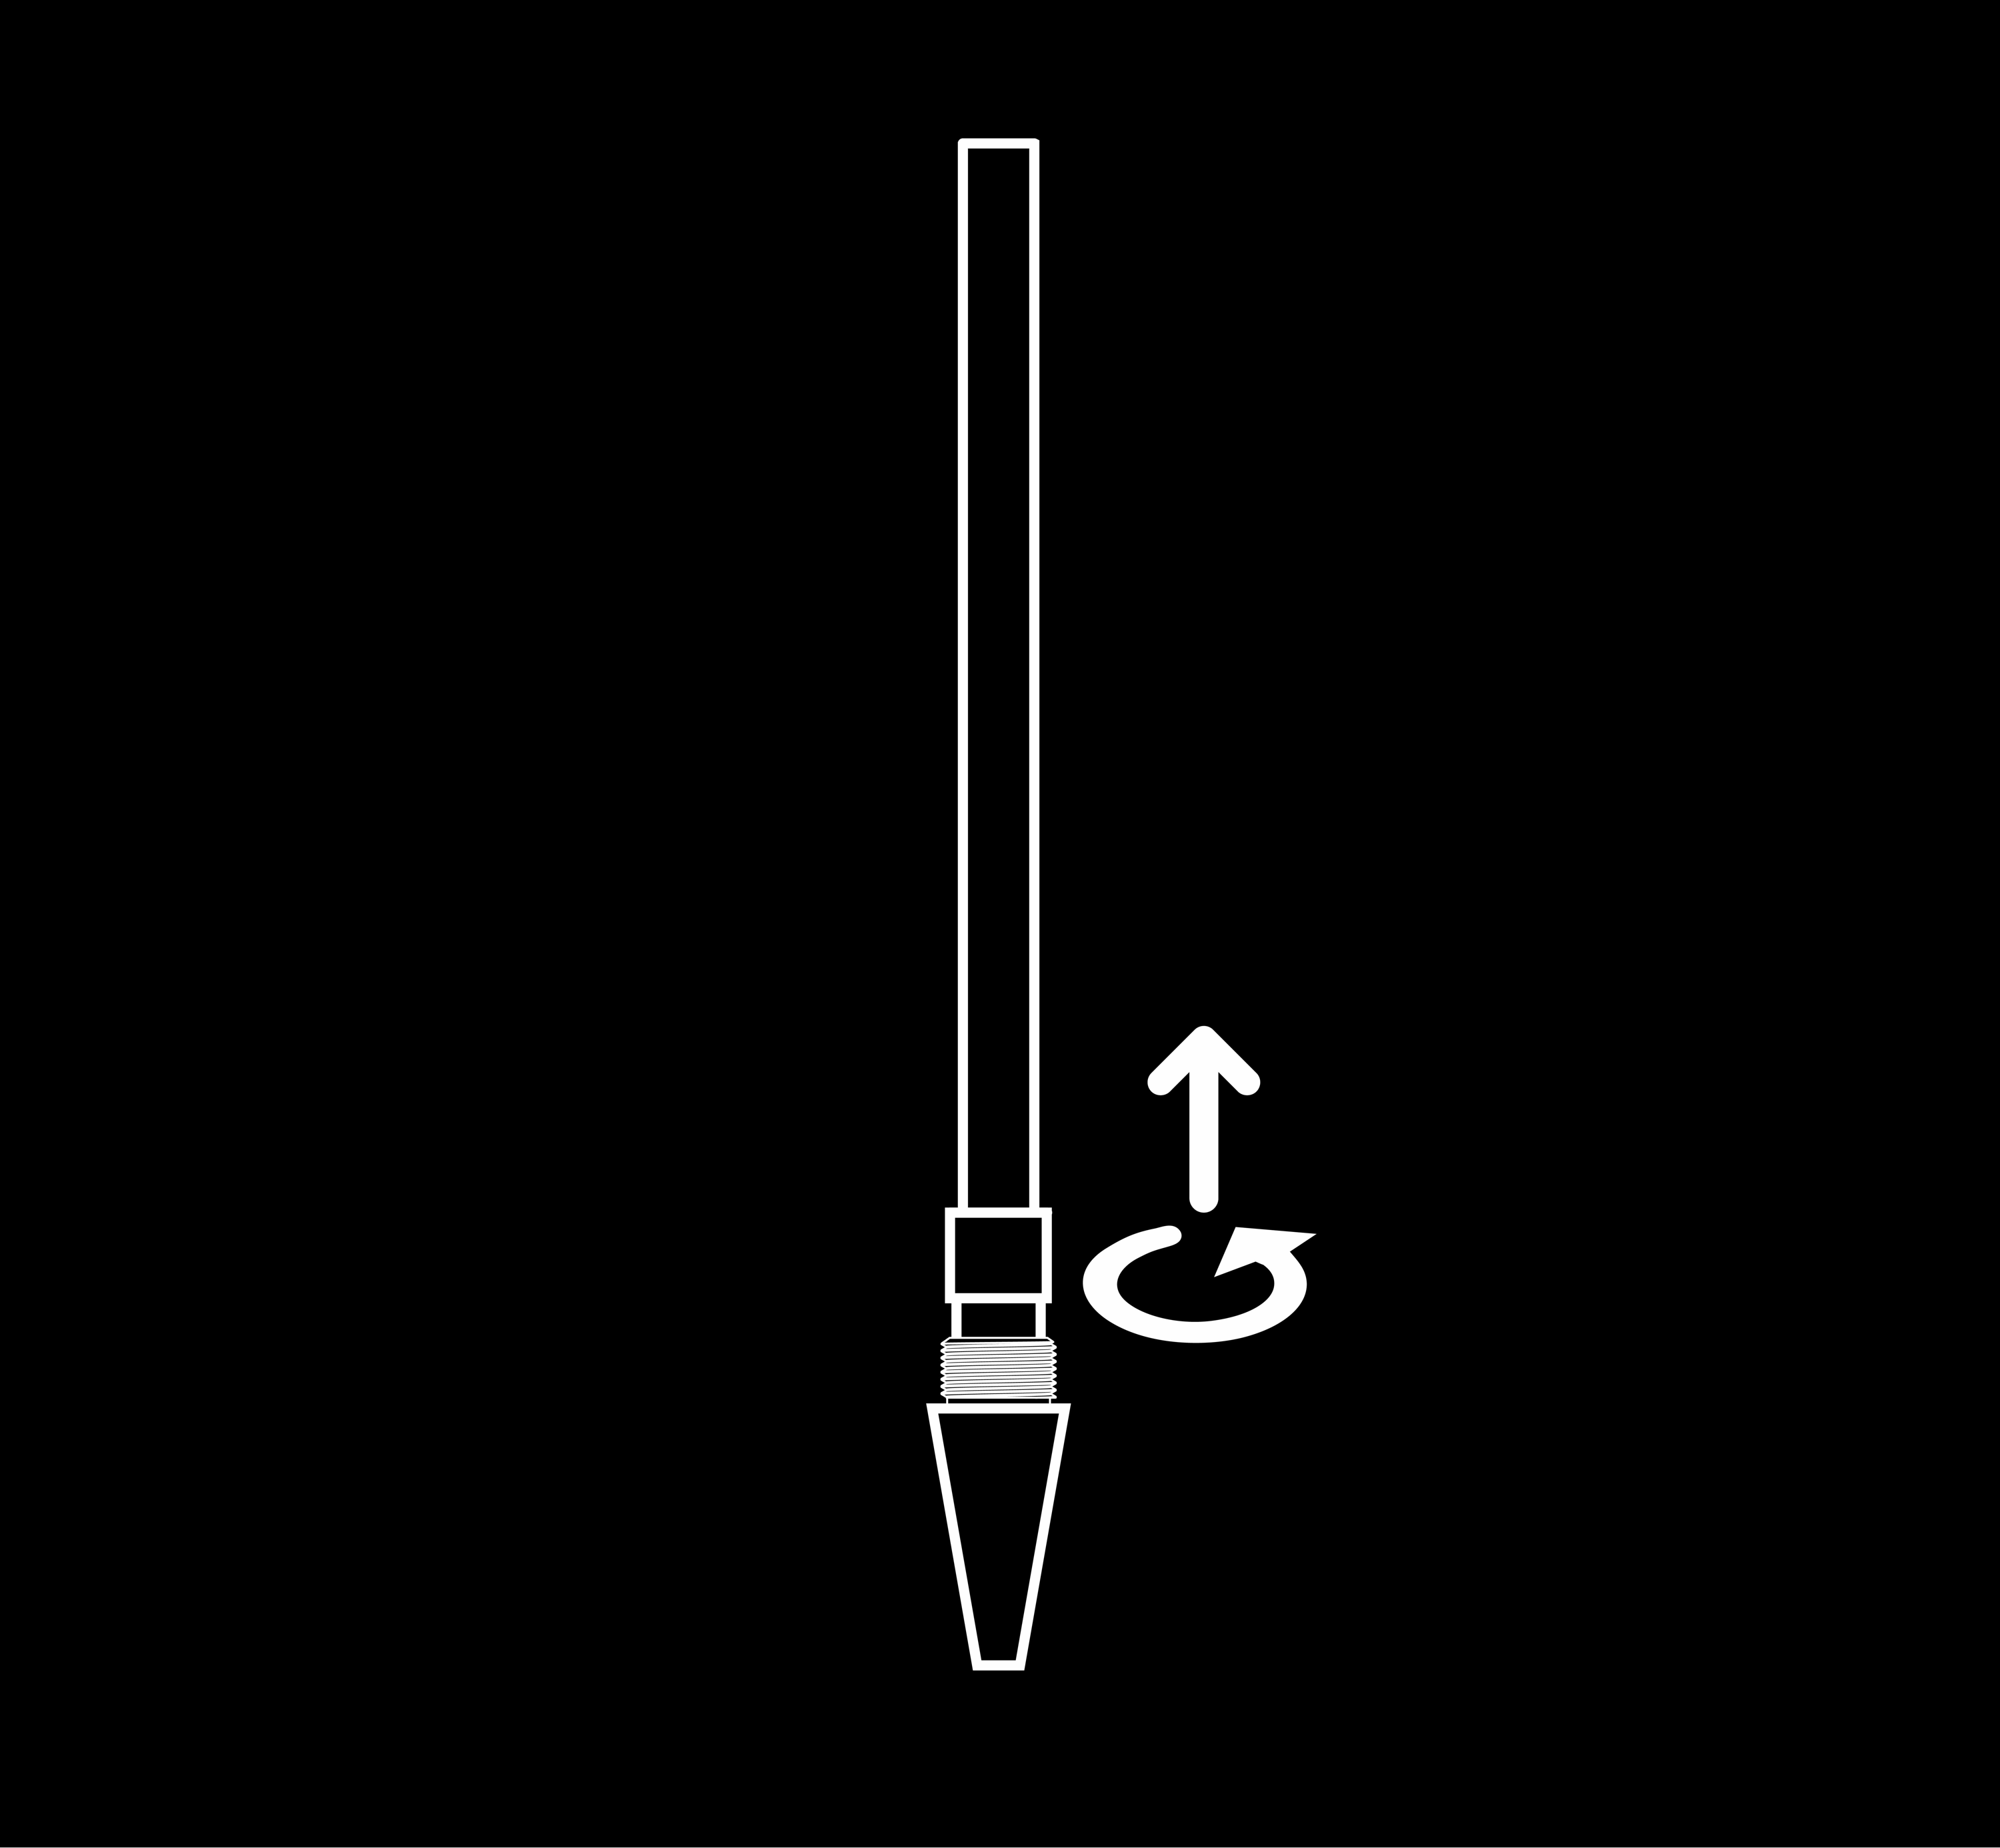
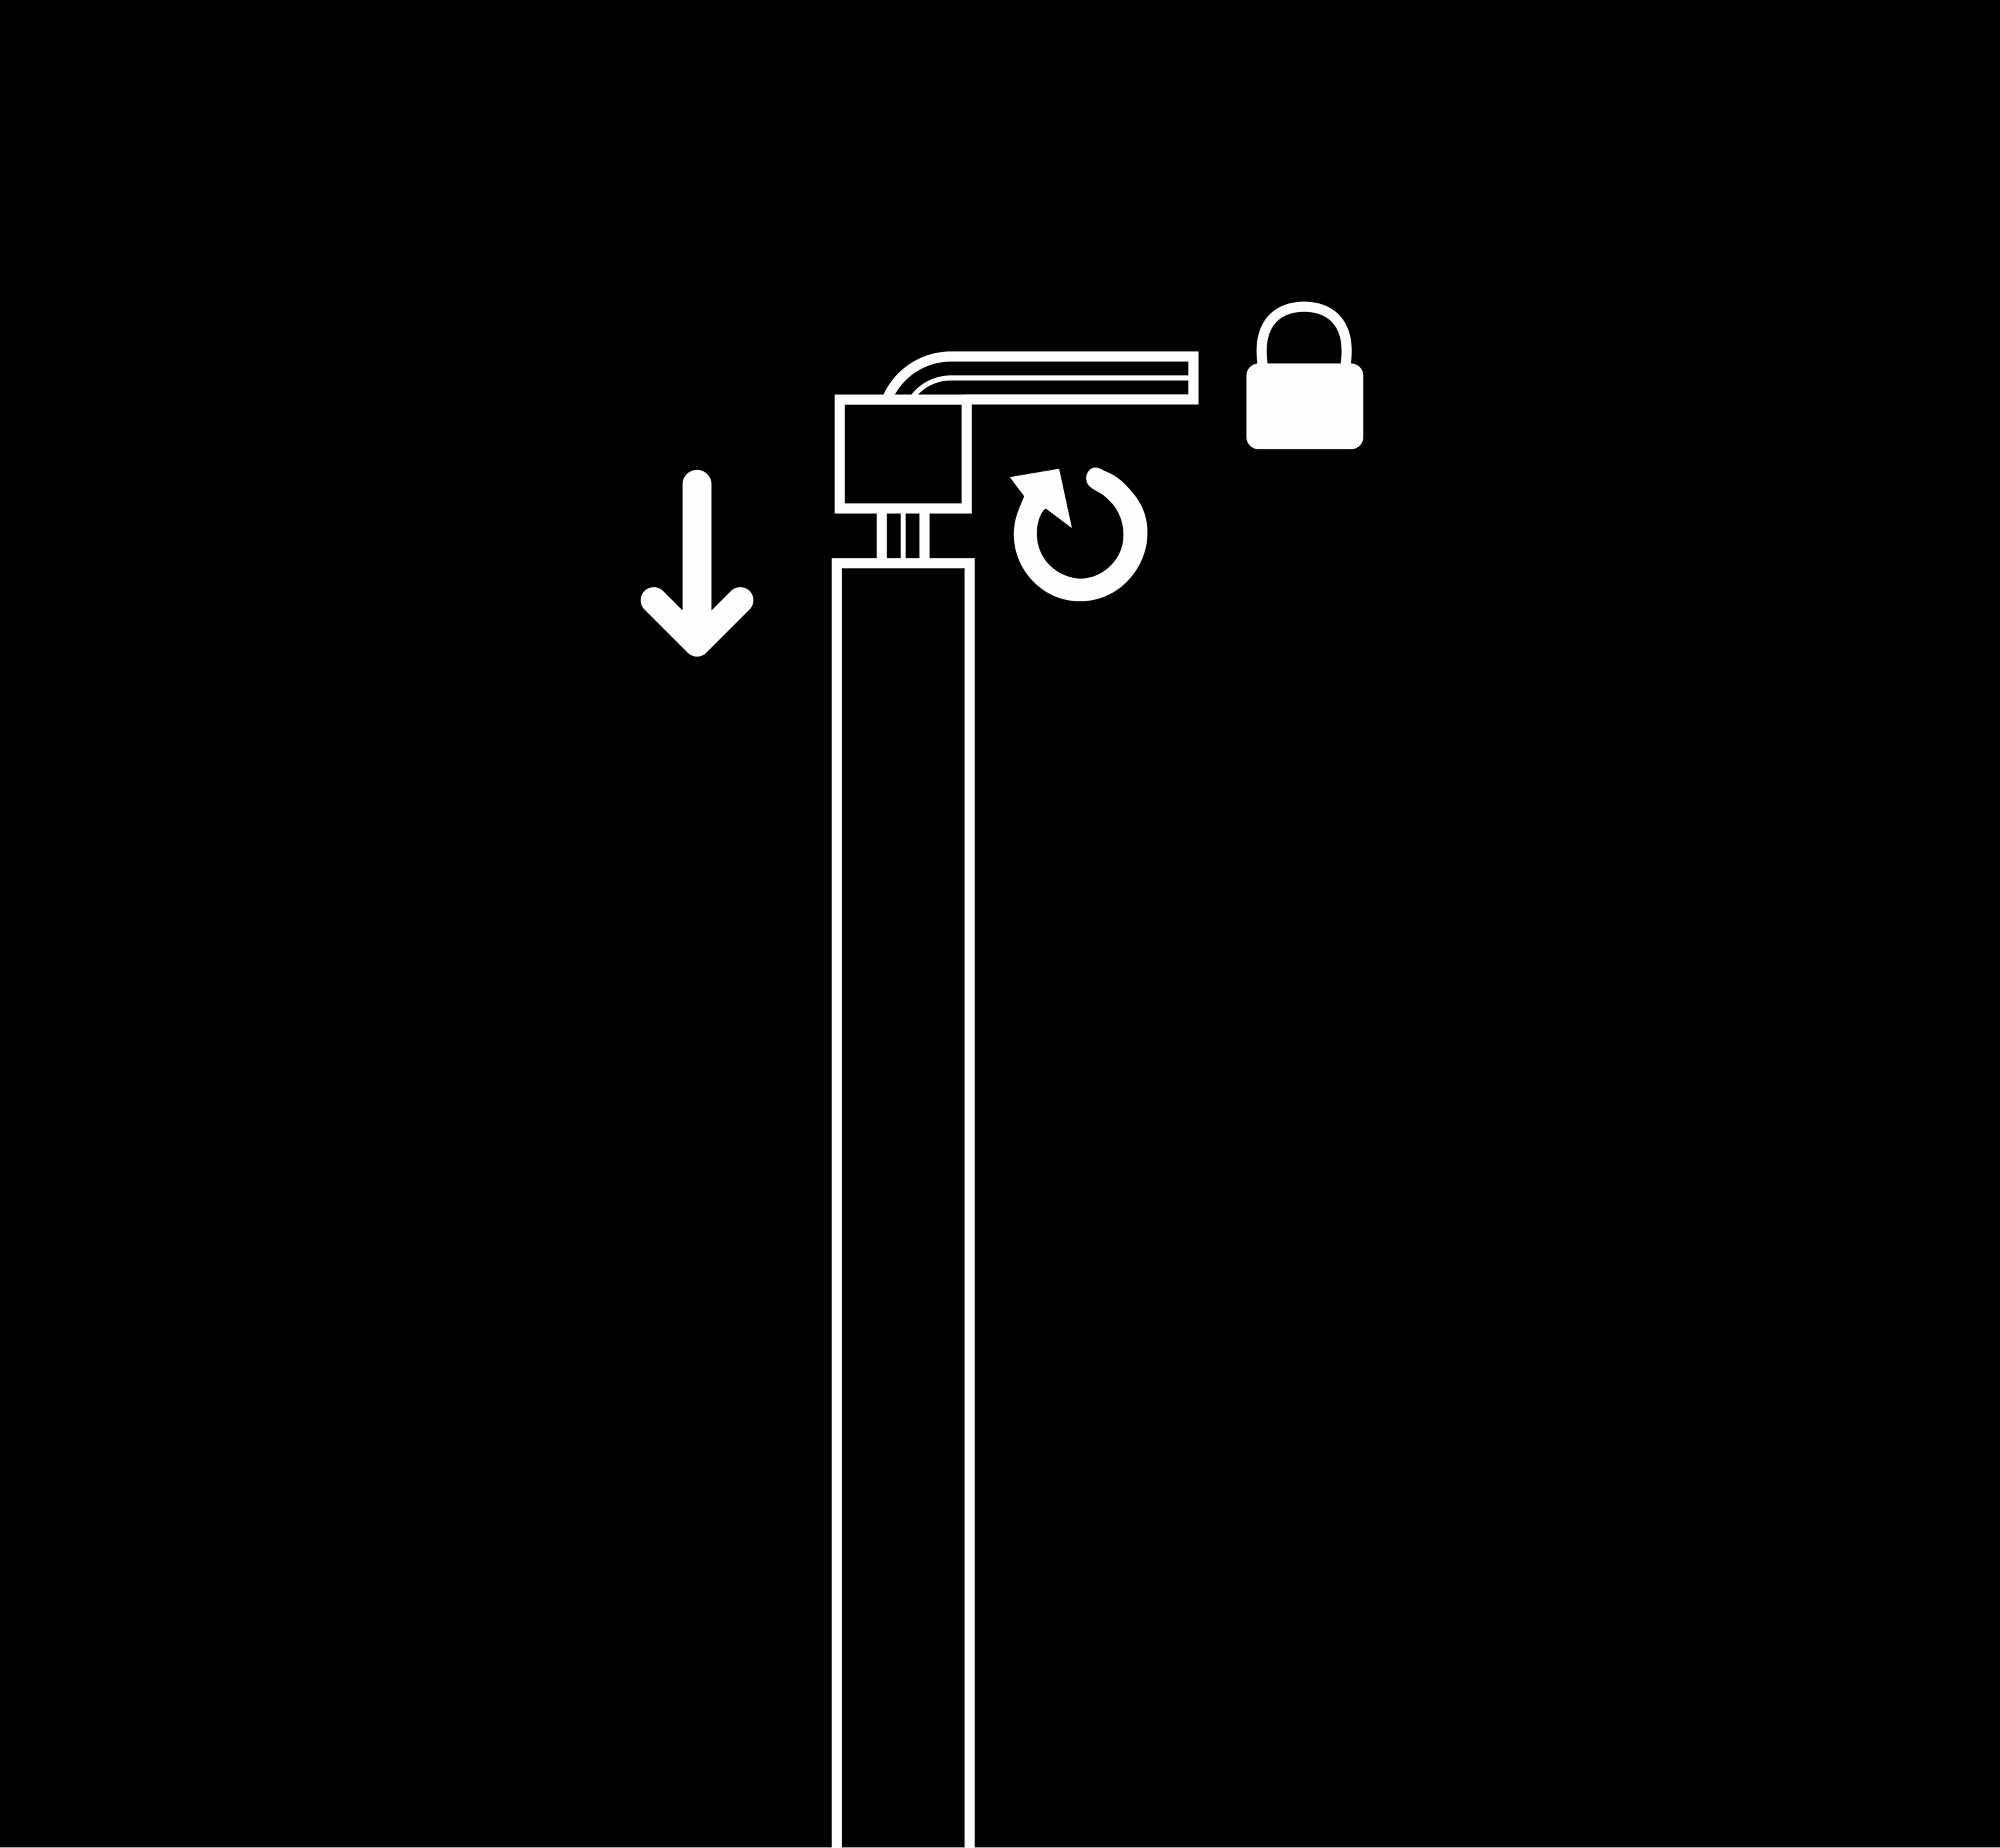
2. Insert the allen wrench and adjust it (slowly rotate or wiggle) until the allen wrench fully drops into place as shown below.
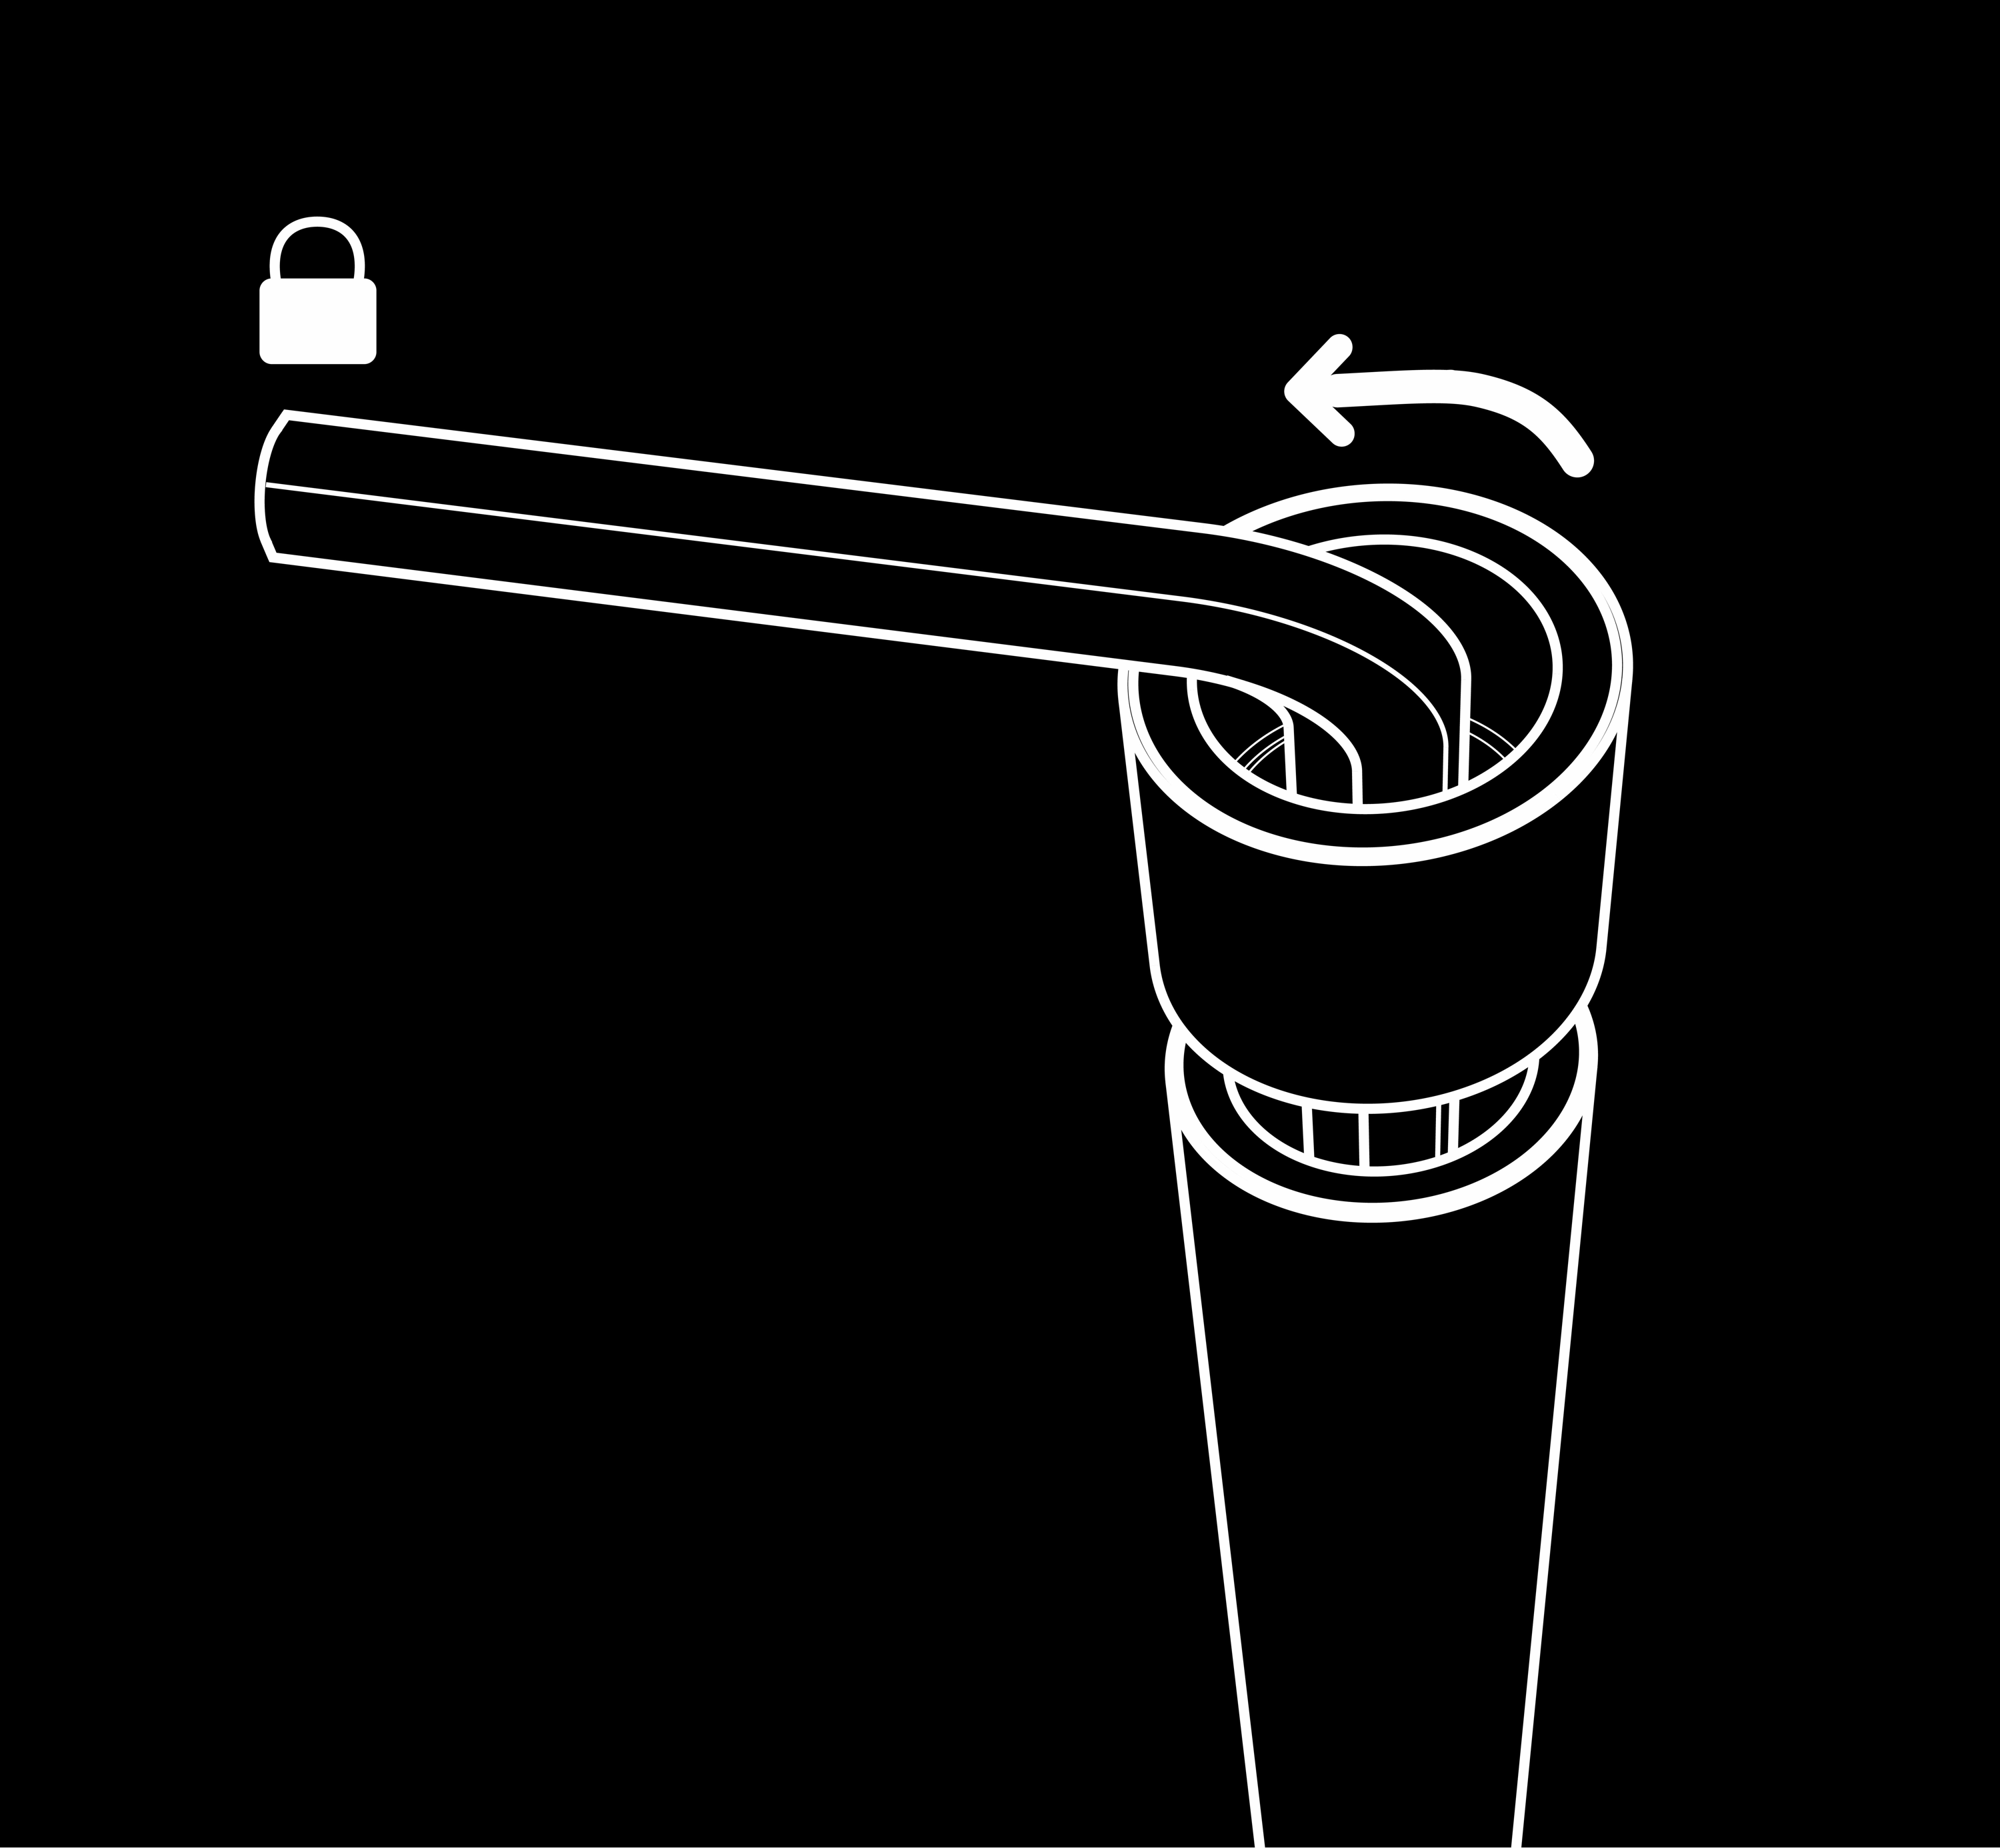
3. Hold the allen wrench in place to keep it from rotating and rotate the cap end in a counter-clockwise manner until the cap end and allen wrench are released from the pencil assembly
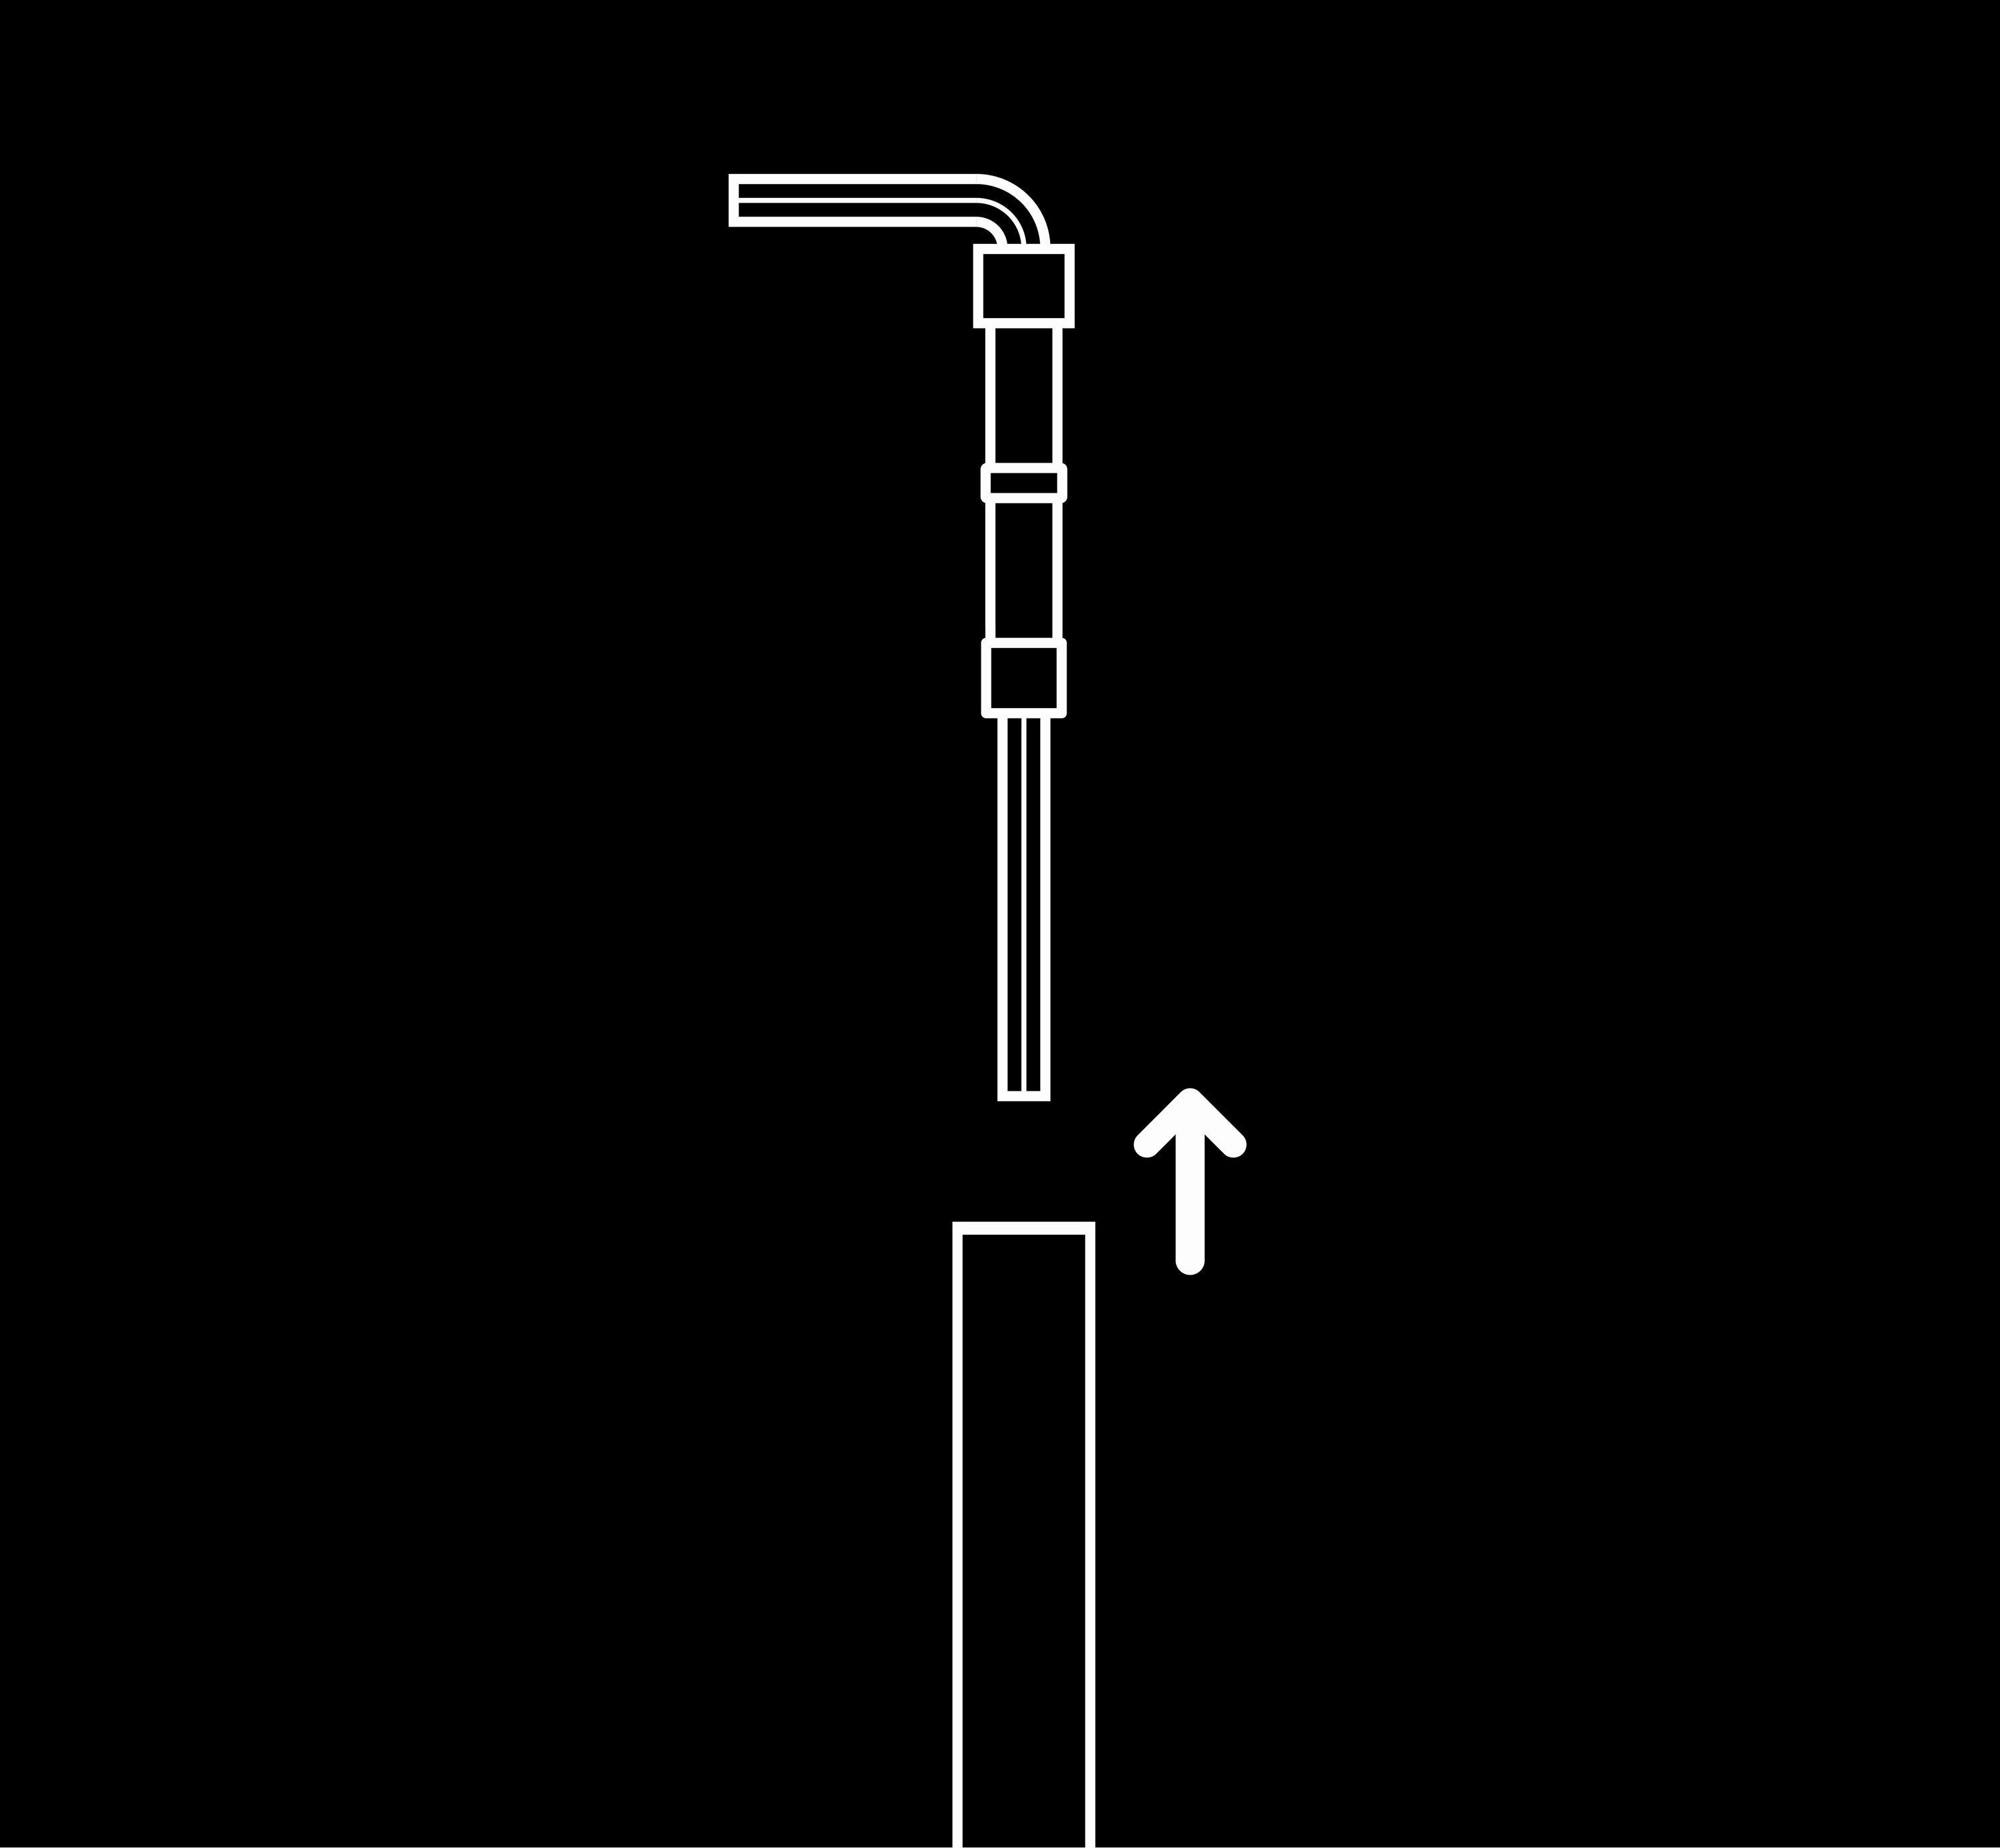
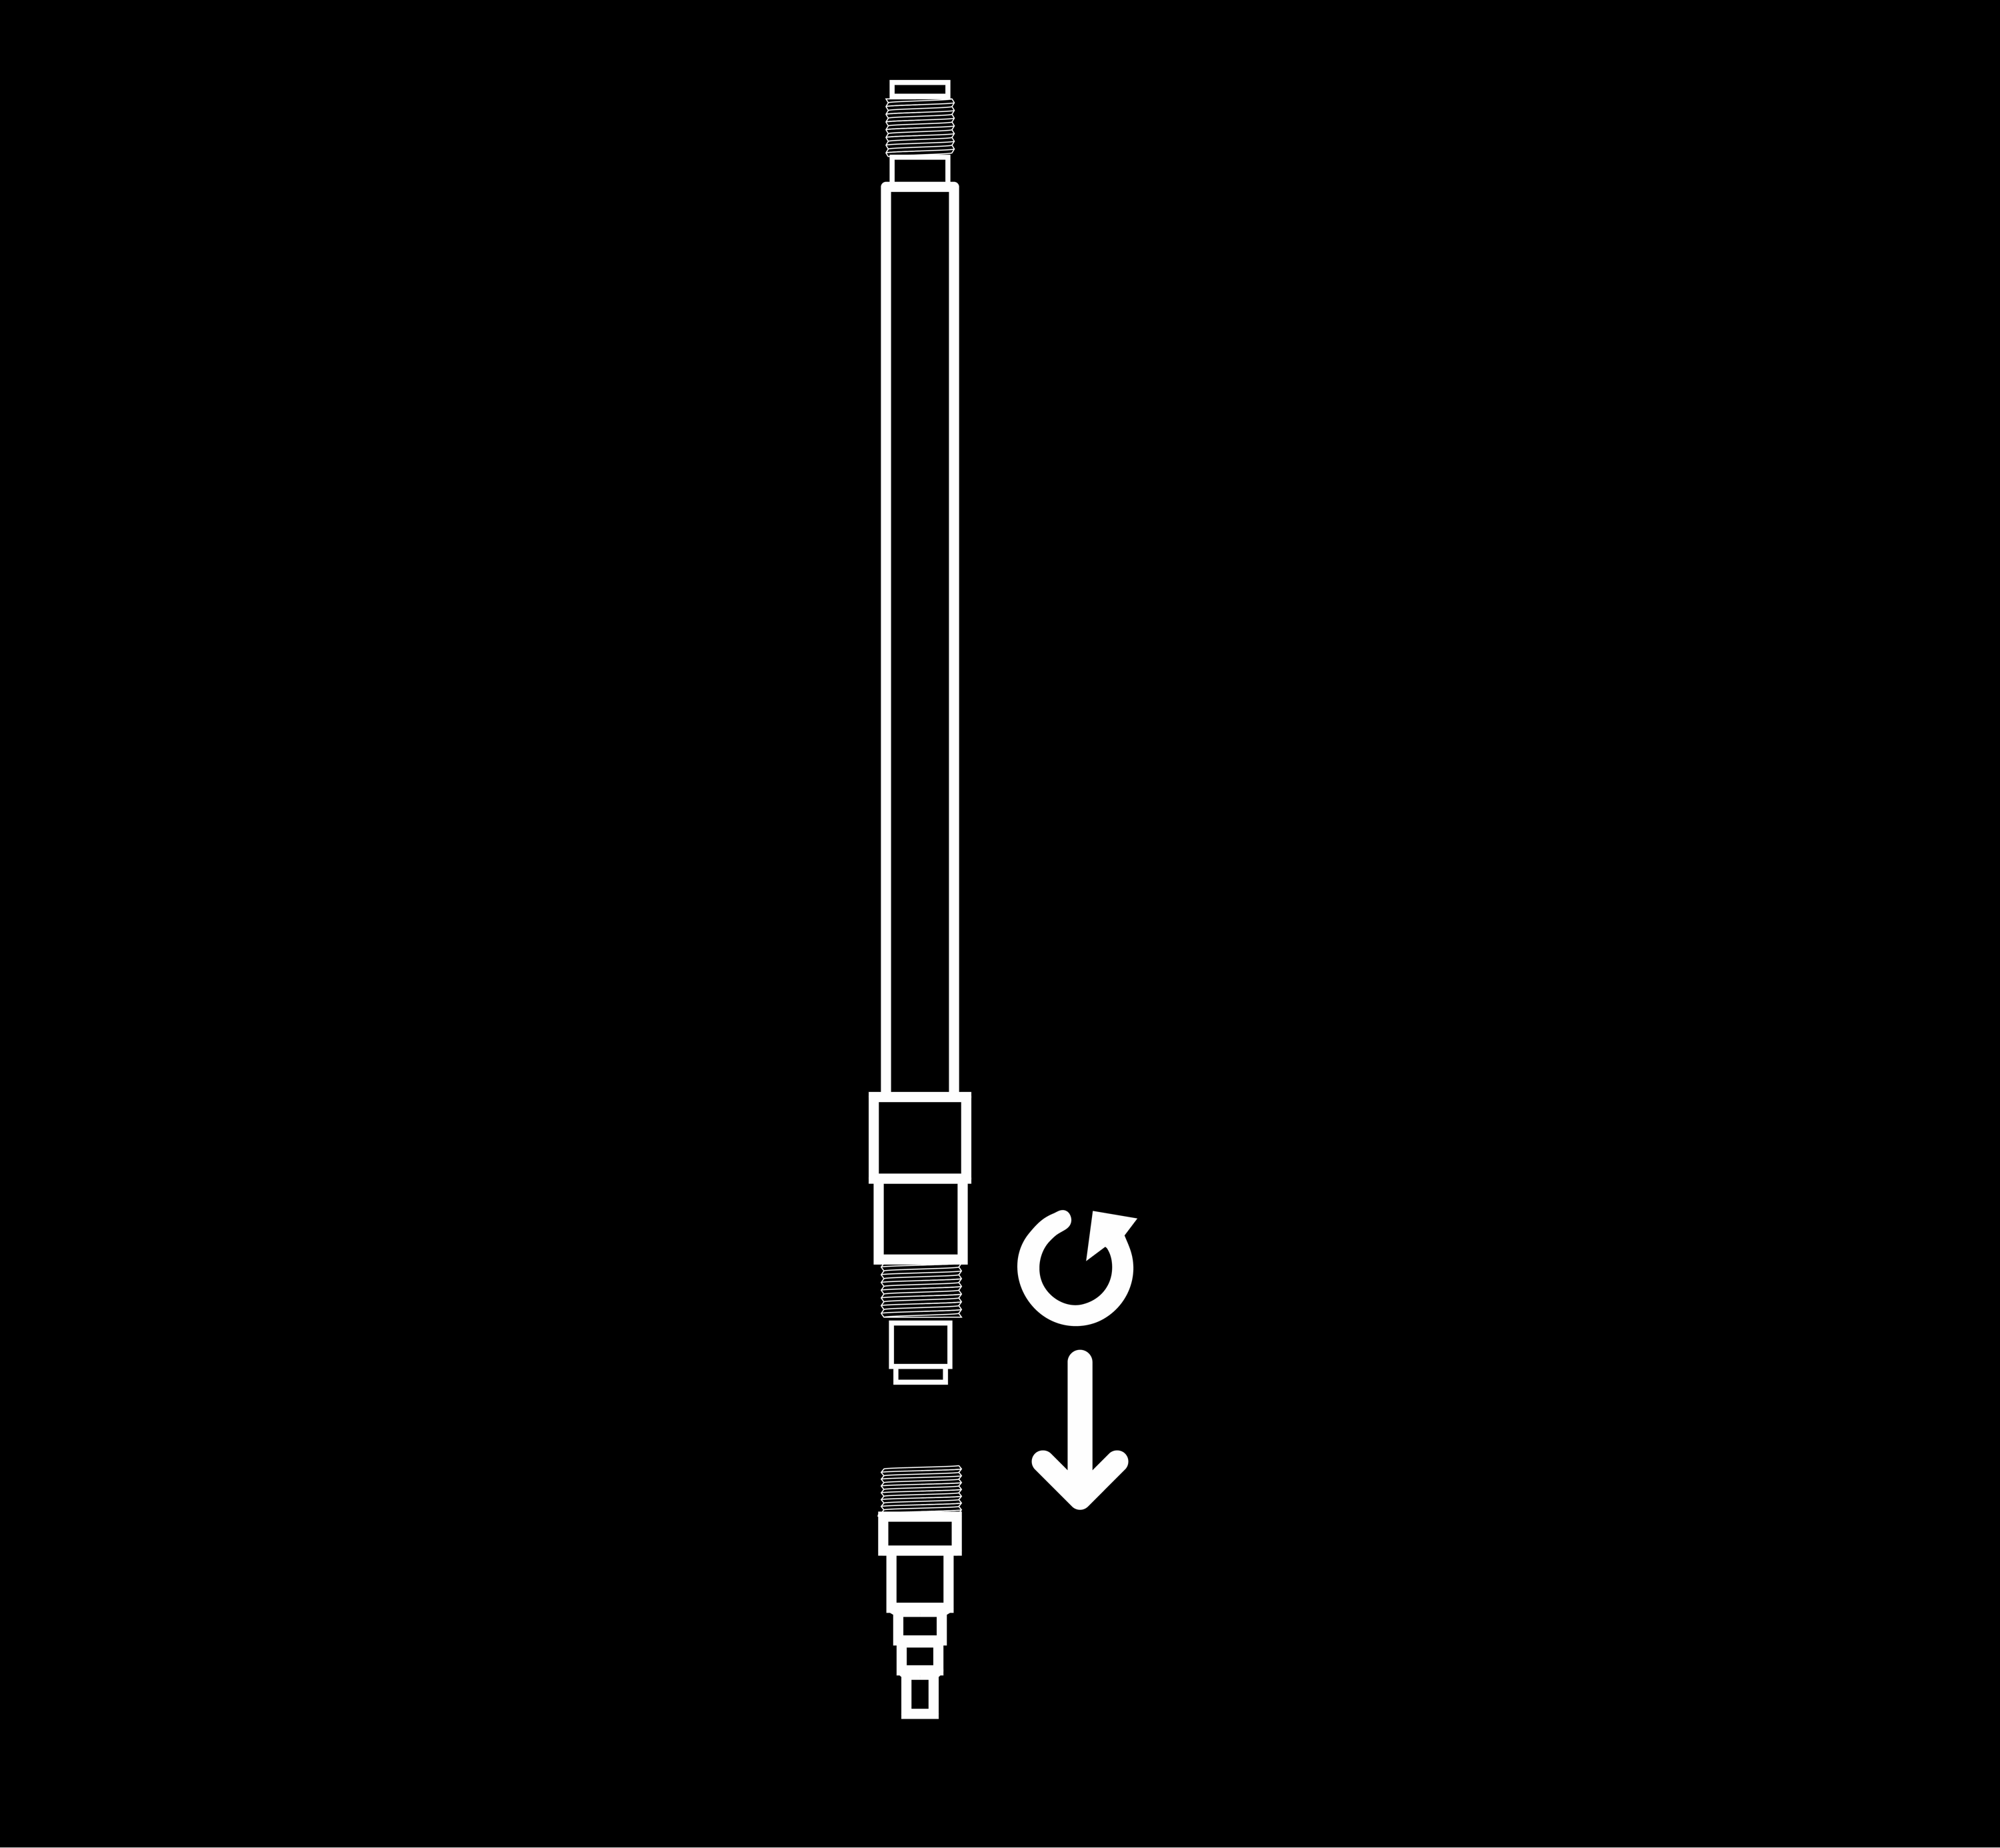
4. Unscrew the cone of the pencil. The mechanism will come out with the cone
5. Unscrew the mechanism from the cone of the pencil. Swap to a new mechanism, as applicable
You may assemble your pencil with the following steps:
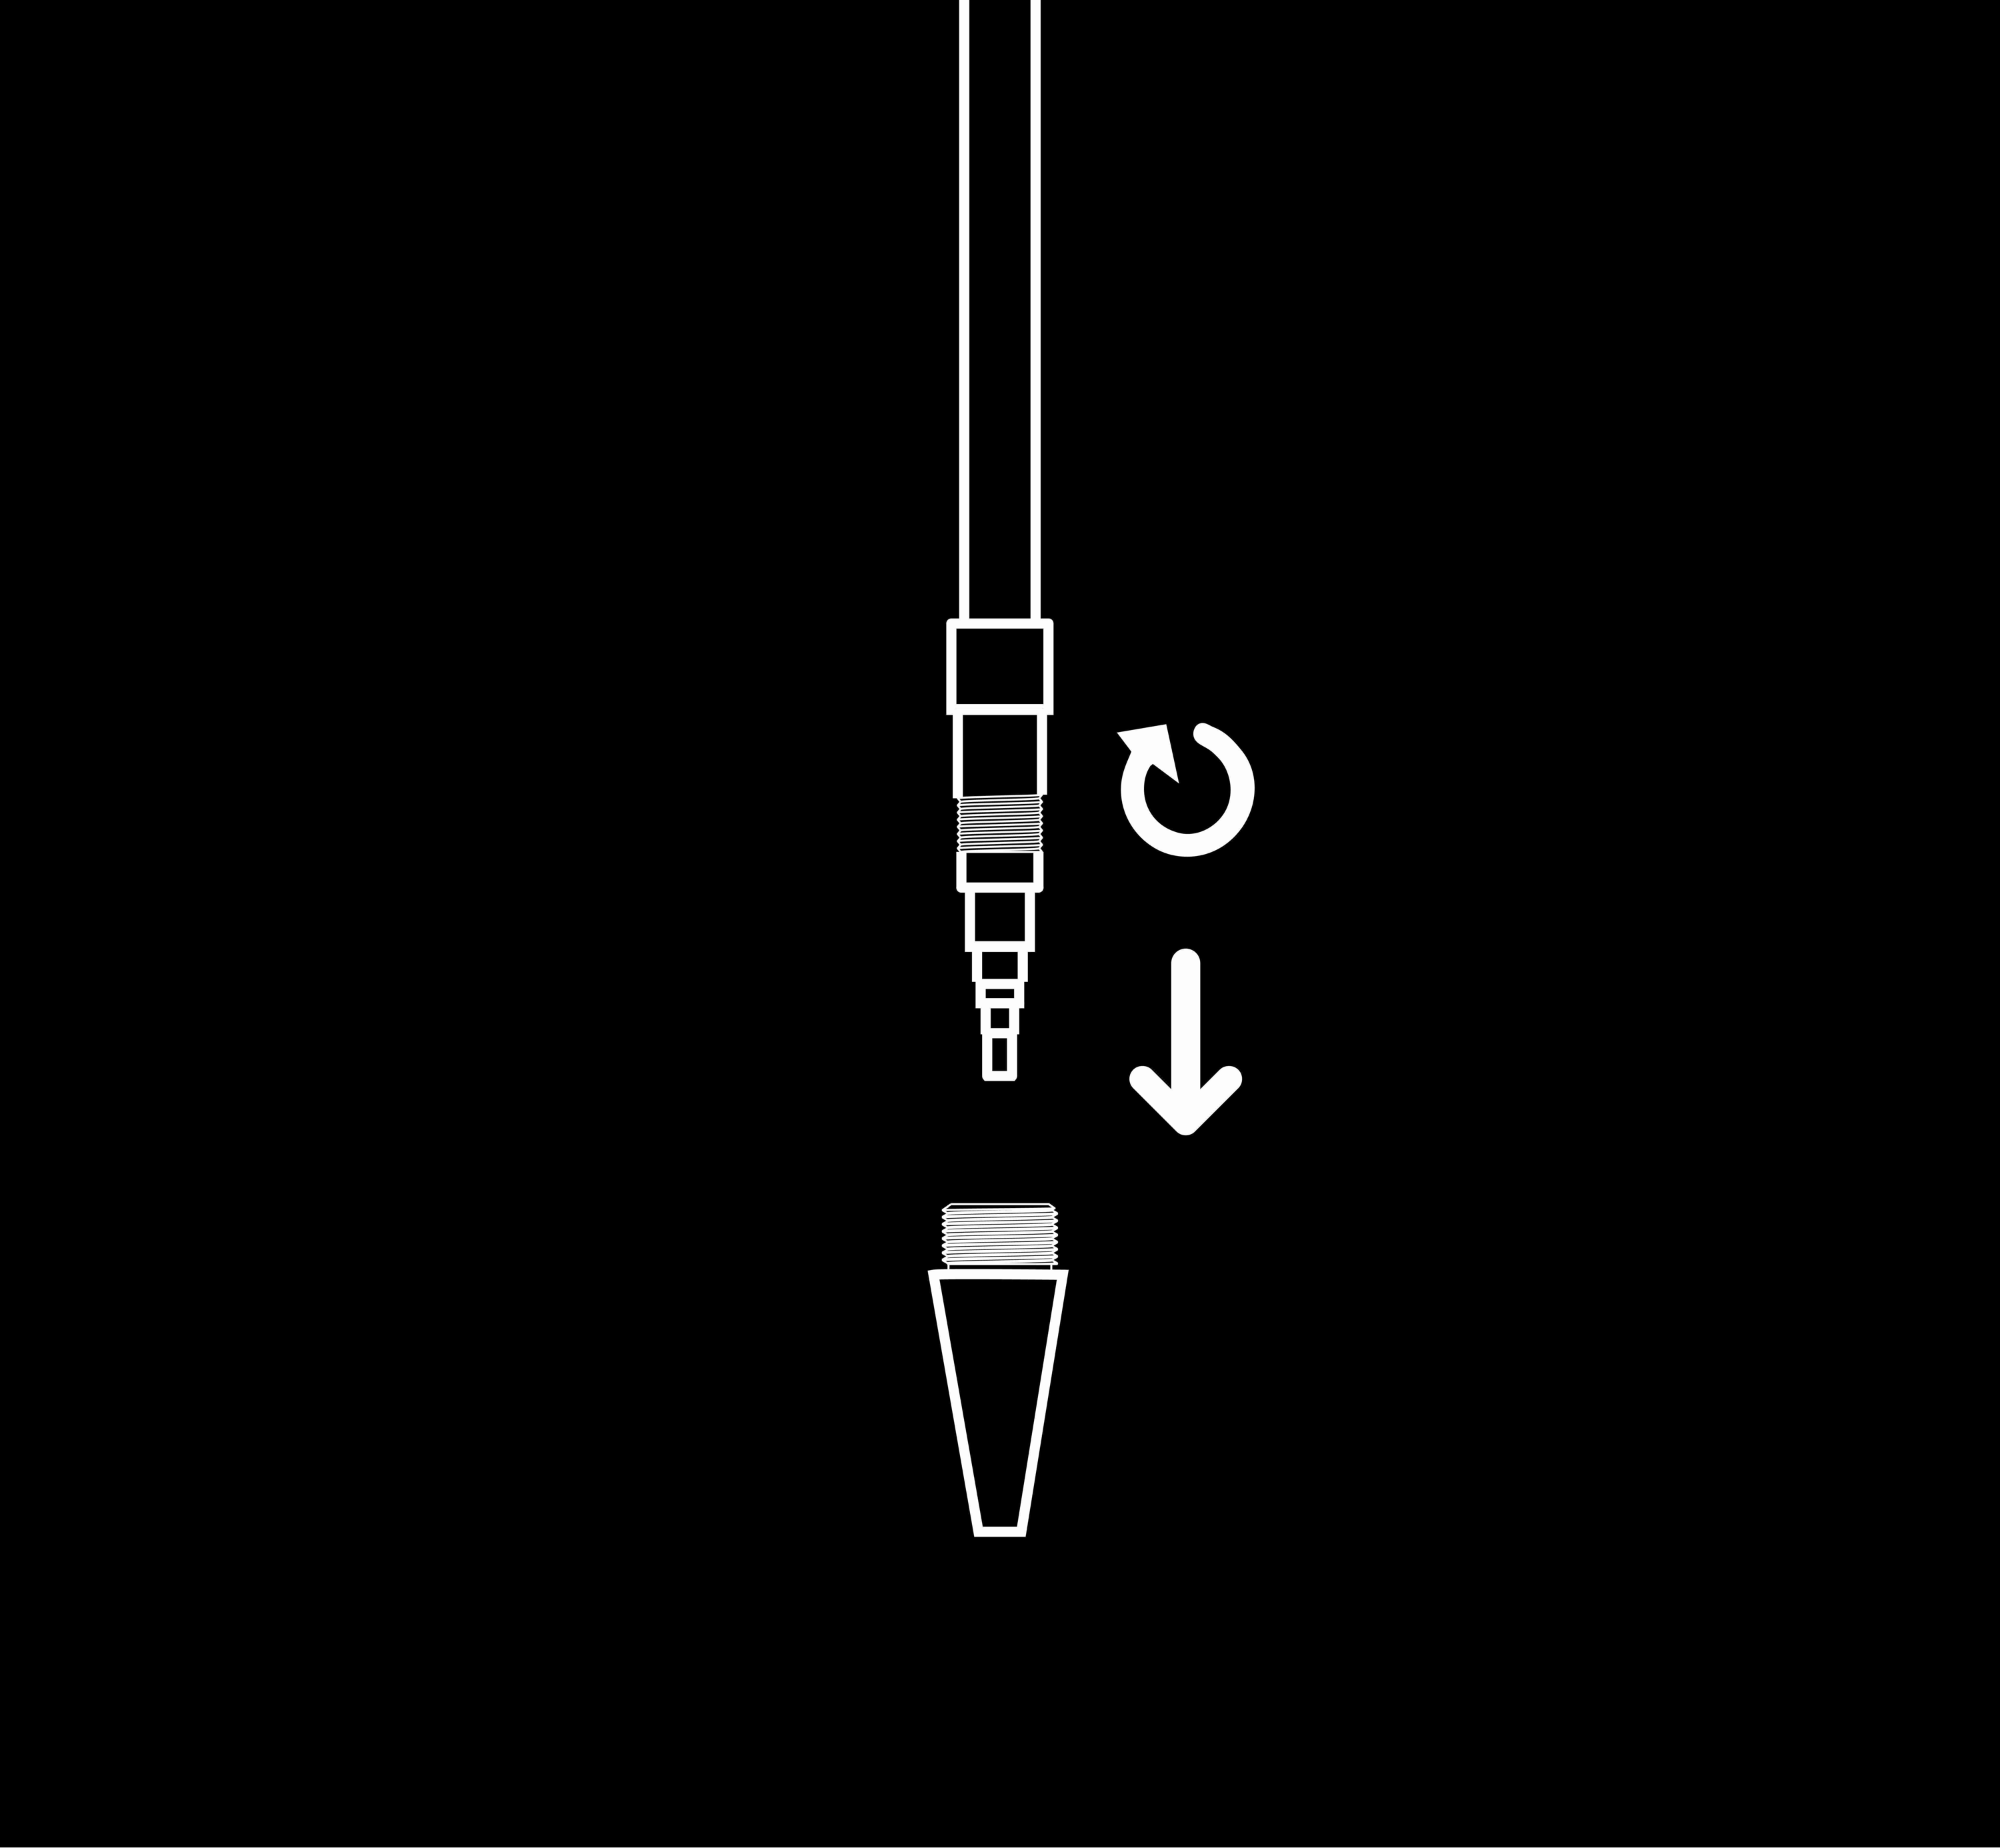
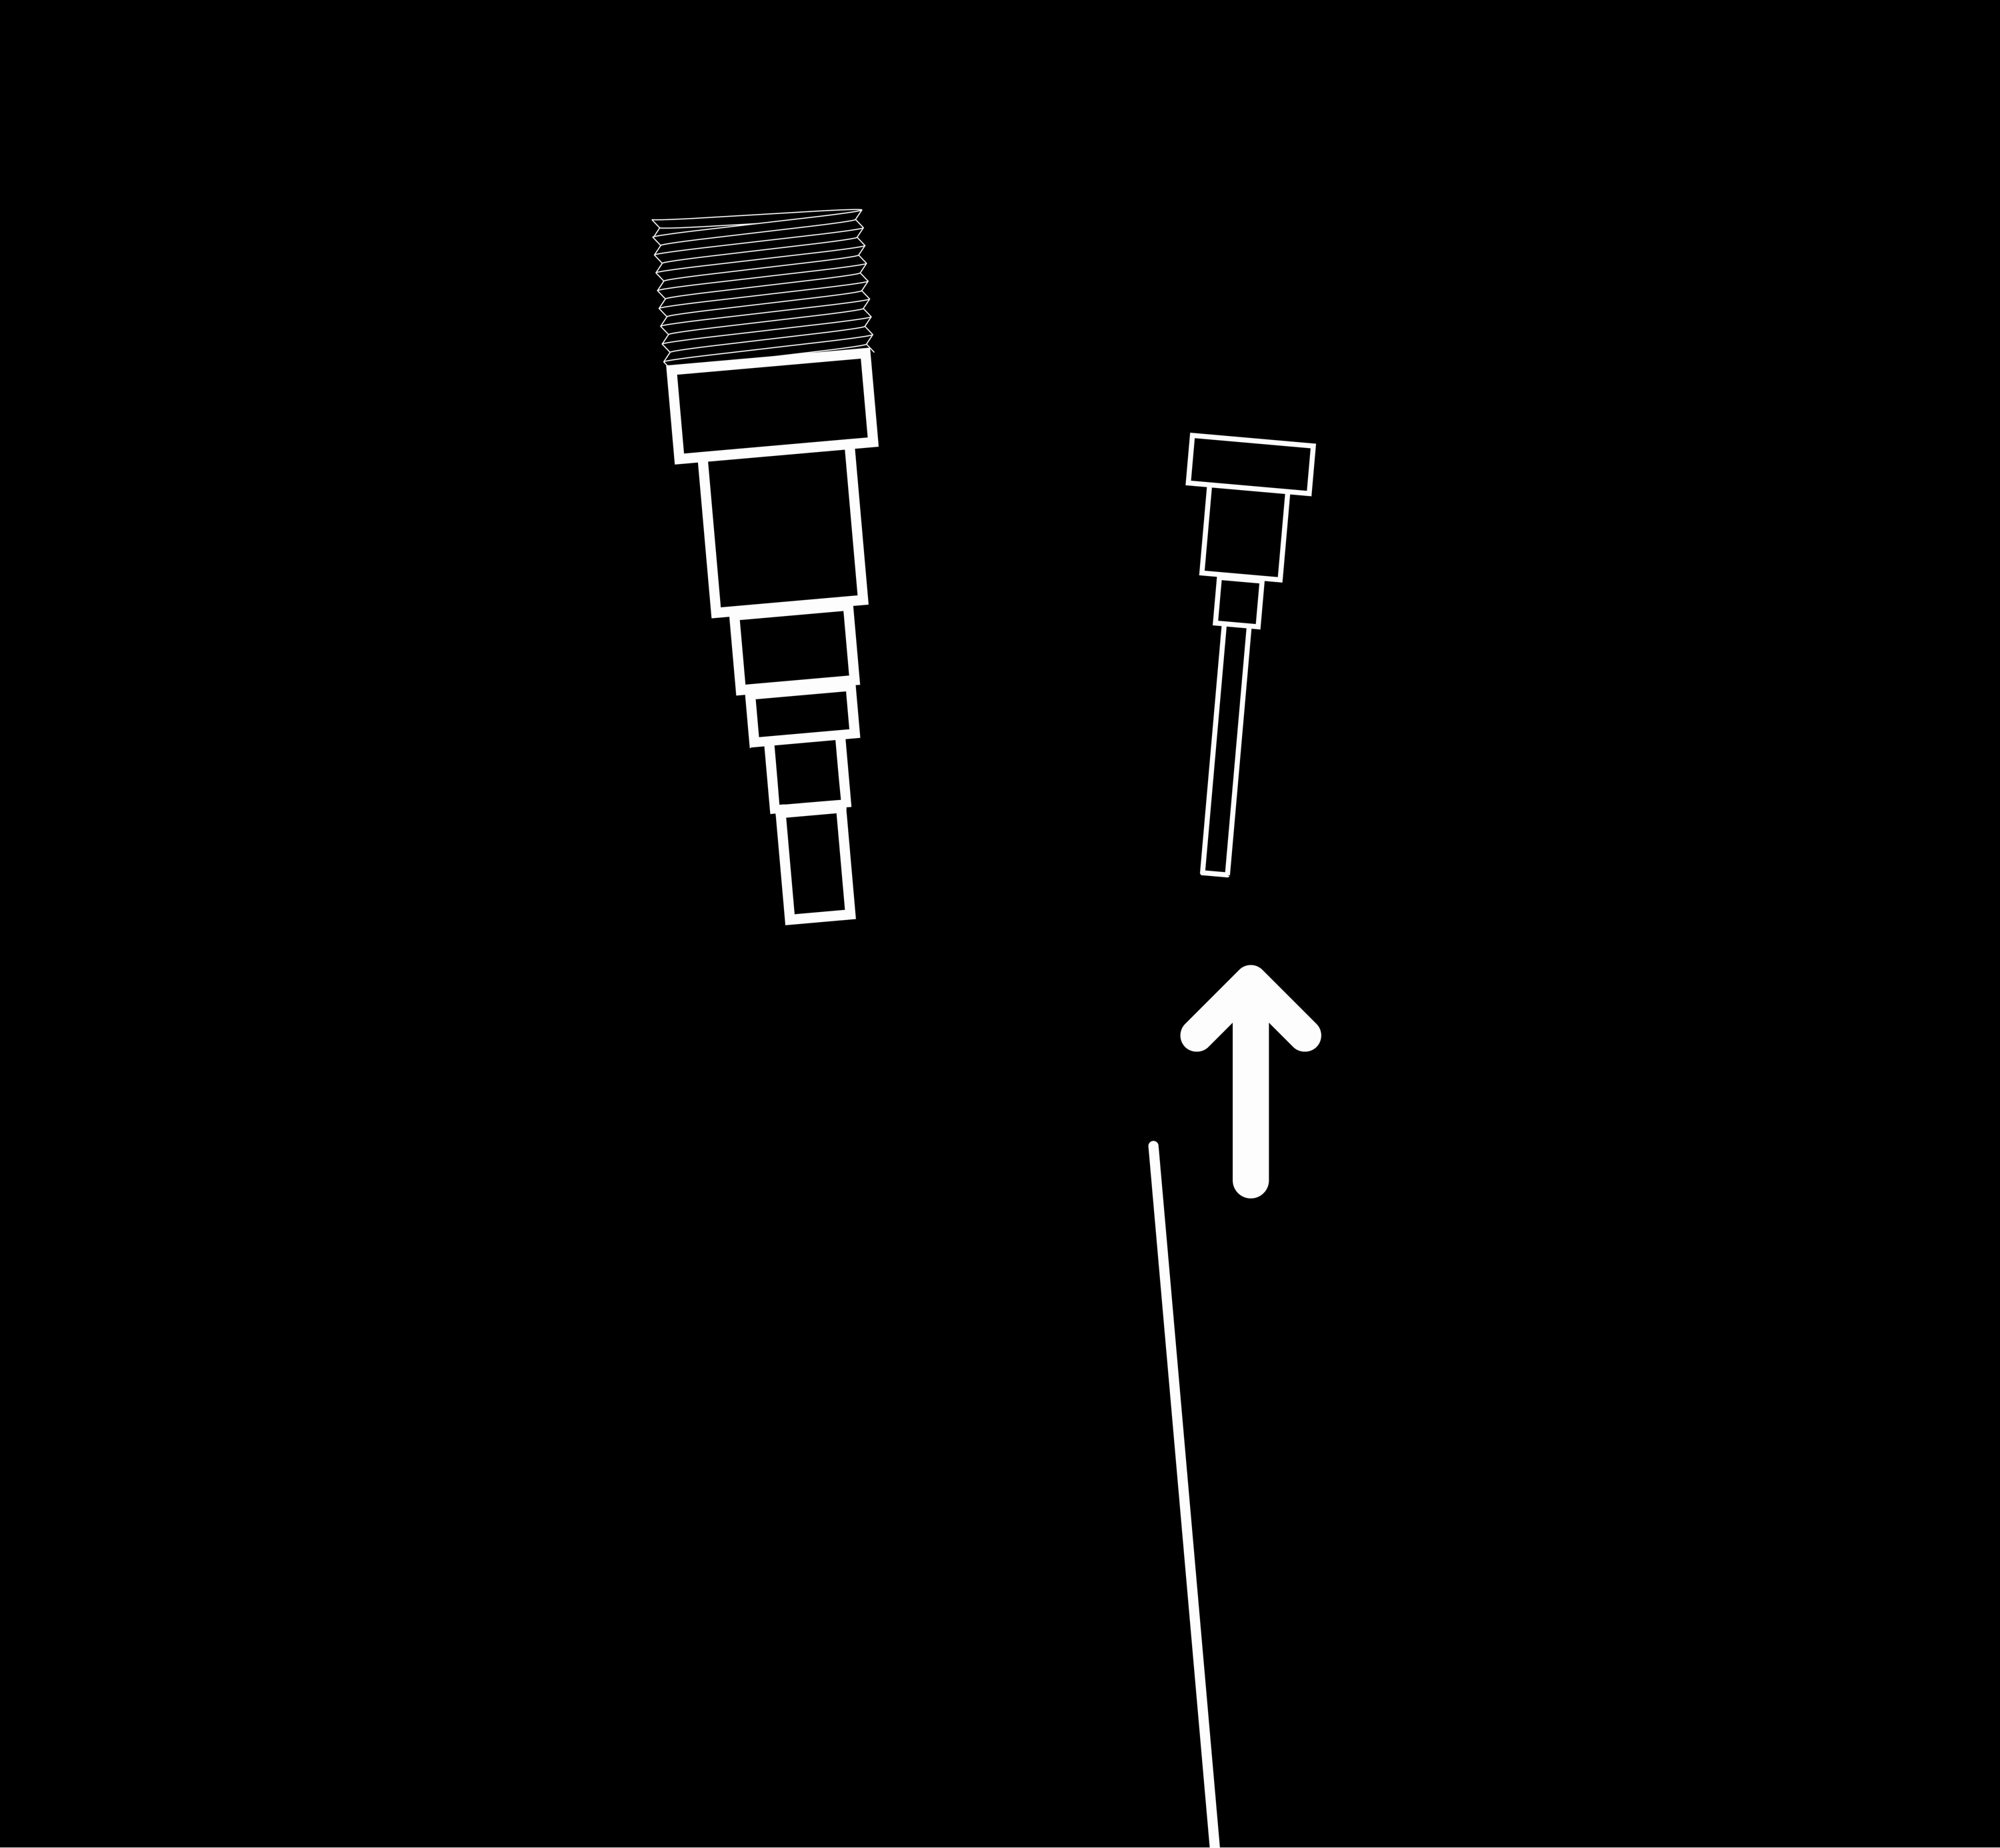
1. Screw the mechanism into the mechanism cone until the collar of the mechanism is fully seated against the cone

2. Screw the cone of the pencil into the body of the pencil, with the mechanism going inside the body
3. Drop the cap end into place. Insert the allen wrench and adjust it (slowly rotate or wiggle) until the allen wrench fully drops into place as shown below.
4. Hold the allen wrench to keep it from rotating and rotate the cap end clockwise until it is tight (while holding the allen wrench from turning).
5. Insert lead as desired
6. Add your eraser or eraser plug, as desired.
You may assemble your pencil with the following steps:
1. Remove the mechanism from the pencil following the disassembly process
2. Remove any spare graphite from the mechanism by dumping it out
3. Unscrew the cone of the mechanism
4. Using a spare piece of graphite, clear out the graphite support tube. It is recommended to also use compressed air to blow out the mechanism cone. Use caution to protect your eyes during this process.
5. Check the clutch area to ensure no pieces are stuck. Remove graphite debris / dust as necessary.
6. Reinstall the mechanism cone and follow instructions for pencil assembly
To troubleshoot graphite that will not advance, please start by ensuring that extra pieces of graphite are inside the tube of the mechanism. Then, try shaking your pencil several times while clicking the knock to advance the graphite at the same time.
If you are still not successful, follow the steps above to clean the pencil mechanism and repeat the steps shown in the previous paragraph.
1. Carefully insert a single blade of a pair of scissors into the cone

2. Being careful not to slip and cut your finger, hold the pencil cone while applying light pressure into the mechanism cone with the blade of scissors, and rotate the scissor blade counter-clockwise. You should feel the scissors “bite” into the mechanism cone and unscrew it.
3. Re-install the mechanism cone as needed or install a new mechanism into your pencil.
Raw copper and bronze will develop a natural patina over time. Most people appreciate this rustic look, however if you wish to restore your pencil to its original condition you may with the following steps.
Short top in soft fabric with a square neckline and draped bodice. Long sleeves with narrow elastic at shoulders and cuffs. Lined bodice.
Thank you for using our Modern Fuel Click Pencil. It is a precision writing instrument that has been manufactured to the highest quality standards and we hope that it will provide you many years of optimal use. Your Modern Fuel writing instrument is unique in that its cone and body will only ever match with each other due to the custom-finish process used during the manufacturing process.
For your convenience, we have included written instructions with diagrams below, as well as videos showing how to do the same procedures. Most issues with our writing instruments can be solved quickly using the steps outlined below. Rarely, a manufacturing defect may present itself and necessitate a warranty replacement. See the information below for submitting a request for warranty service.
1. Remove the eraser (or unscrew the eraser plug, if installed)
2. Add the appropriate sized graphite
3. Re-insert the eraser or eraser plug, as desired
The pencil mechanisms can be identified by looking at the cone and reviewing the number of lines. For the bolt action mechanical pencil, the identifying markings are as follows:
3 lines - 0.9mm
2 lines - 0.7mm
No line - 0.5mm
The pencil can be disassembled to change the mechanism or for cleaning as necessary using the following steps:
1. Remove the eraser (or unscrew the eraser plug, if installed)
2. Remove the eraser (or unscrew the eraser plug, if installed)
3. Hold the allen wrench in place to keep it from rotating and rotate the cap end in a counter-clockwise manner until the cap end and allen wrench are released from the pencil assembly
4. Unscrew the cone of the pencil. The mechanism will come out with the cone
4. Unscrew the knock of the pencil from the plunger, being careful not to lose the spring.
You may assemble your pencil with the following steps:
1. Screw the mechanism into the mechanism cone until the collar of the mechanism is fully seated against the cone
2. Screw the cone of the pencil into the body of the pencil, with the mechanism going inside the body

3. Drop the cap end into place. Insert the allen wrench and adjust it (slowly rotate or wiggle) until the allen wrench fully drops into place as shown below.
4. Hold the allen wrench to keep it from rotating and rotate the cap end clockwise until it is tight (while holding the allen wrench from turning).
5. Insert lead as desired
6. Add your eraser or eraser plug, as desired.
You may assemble your pencil with the following steps:
1. Remove the mechanism from the pencil following the disassembly process
2. Remove any spare graphite from the mechanism by dumping it out
3. Unscrew the cone of the mechanism
4. Using a spare piece of graphite, clear out the graphite support tube. It is recommended to also use compressed air to blow out the mechanism cone. Use caution to protect your eyes during this process.
5. Check the clutch area to ensure no pieces are stuck. Remove graphite debris / dust as necessary.
6. Reinstall the mechanism cone and follow instructions for pencil assembly
To troubleshoot graphite that will not advance, please start by ensuring that extra pieces of graphite are inside the tube of the mechanism. Then, try shaking your pencil several times while clicking the knock to advance the graphite at the same time.
If you are still not successful, follow the steps above to clean the pencil mechanism and repeat the steps shown in the previous paragraph.
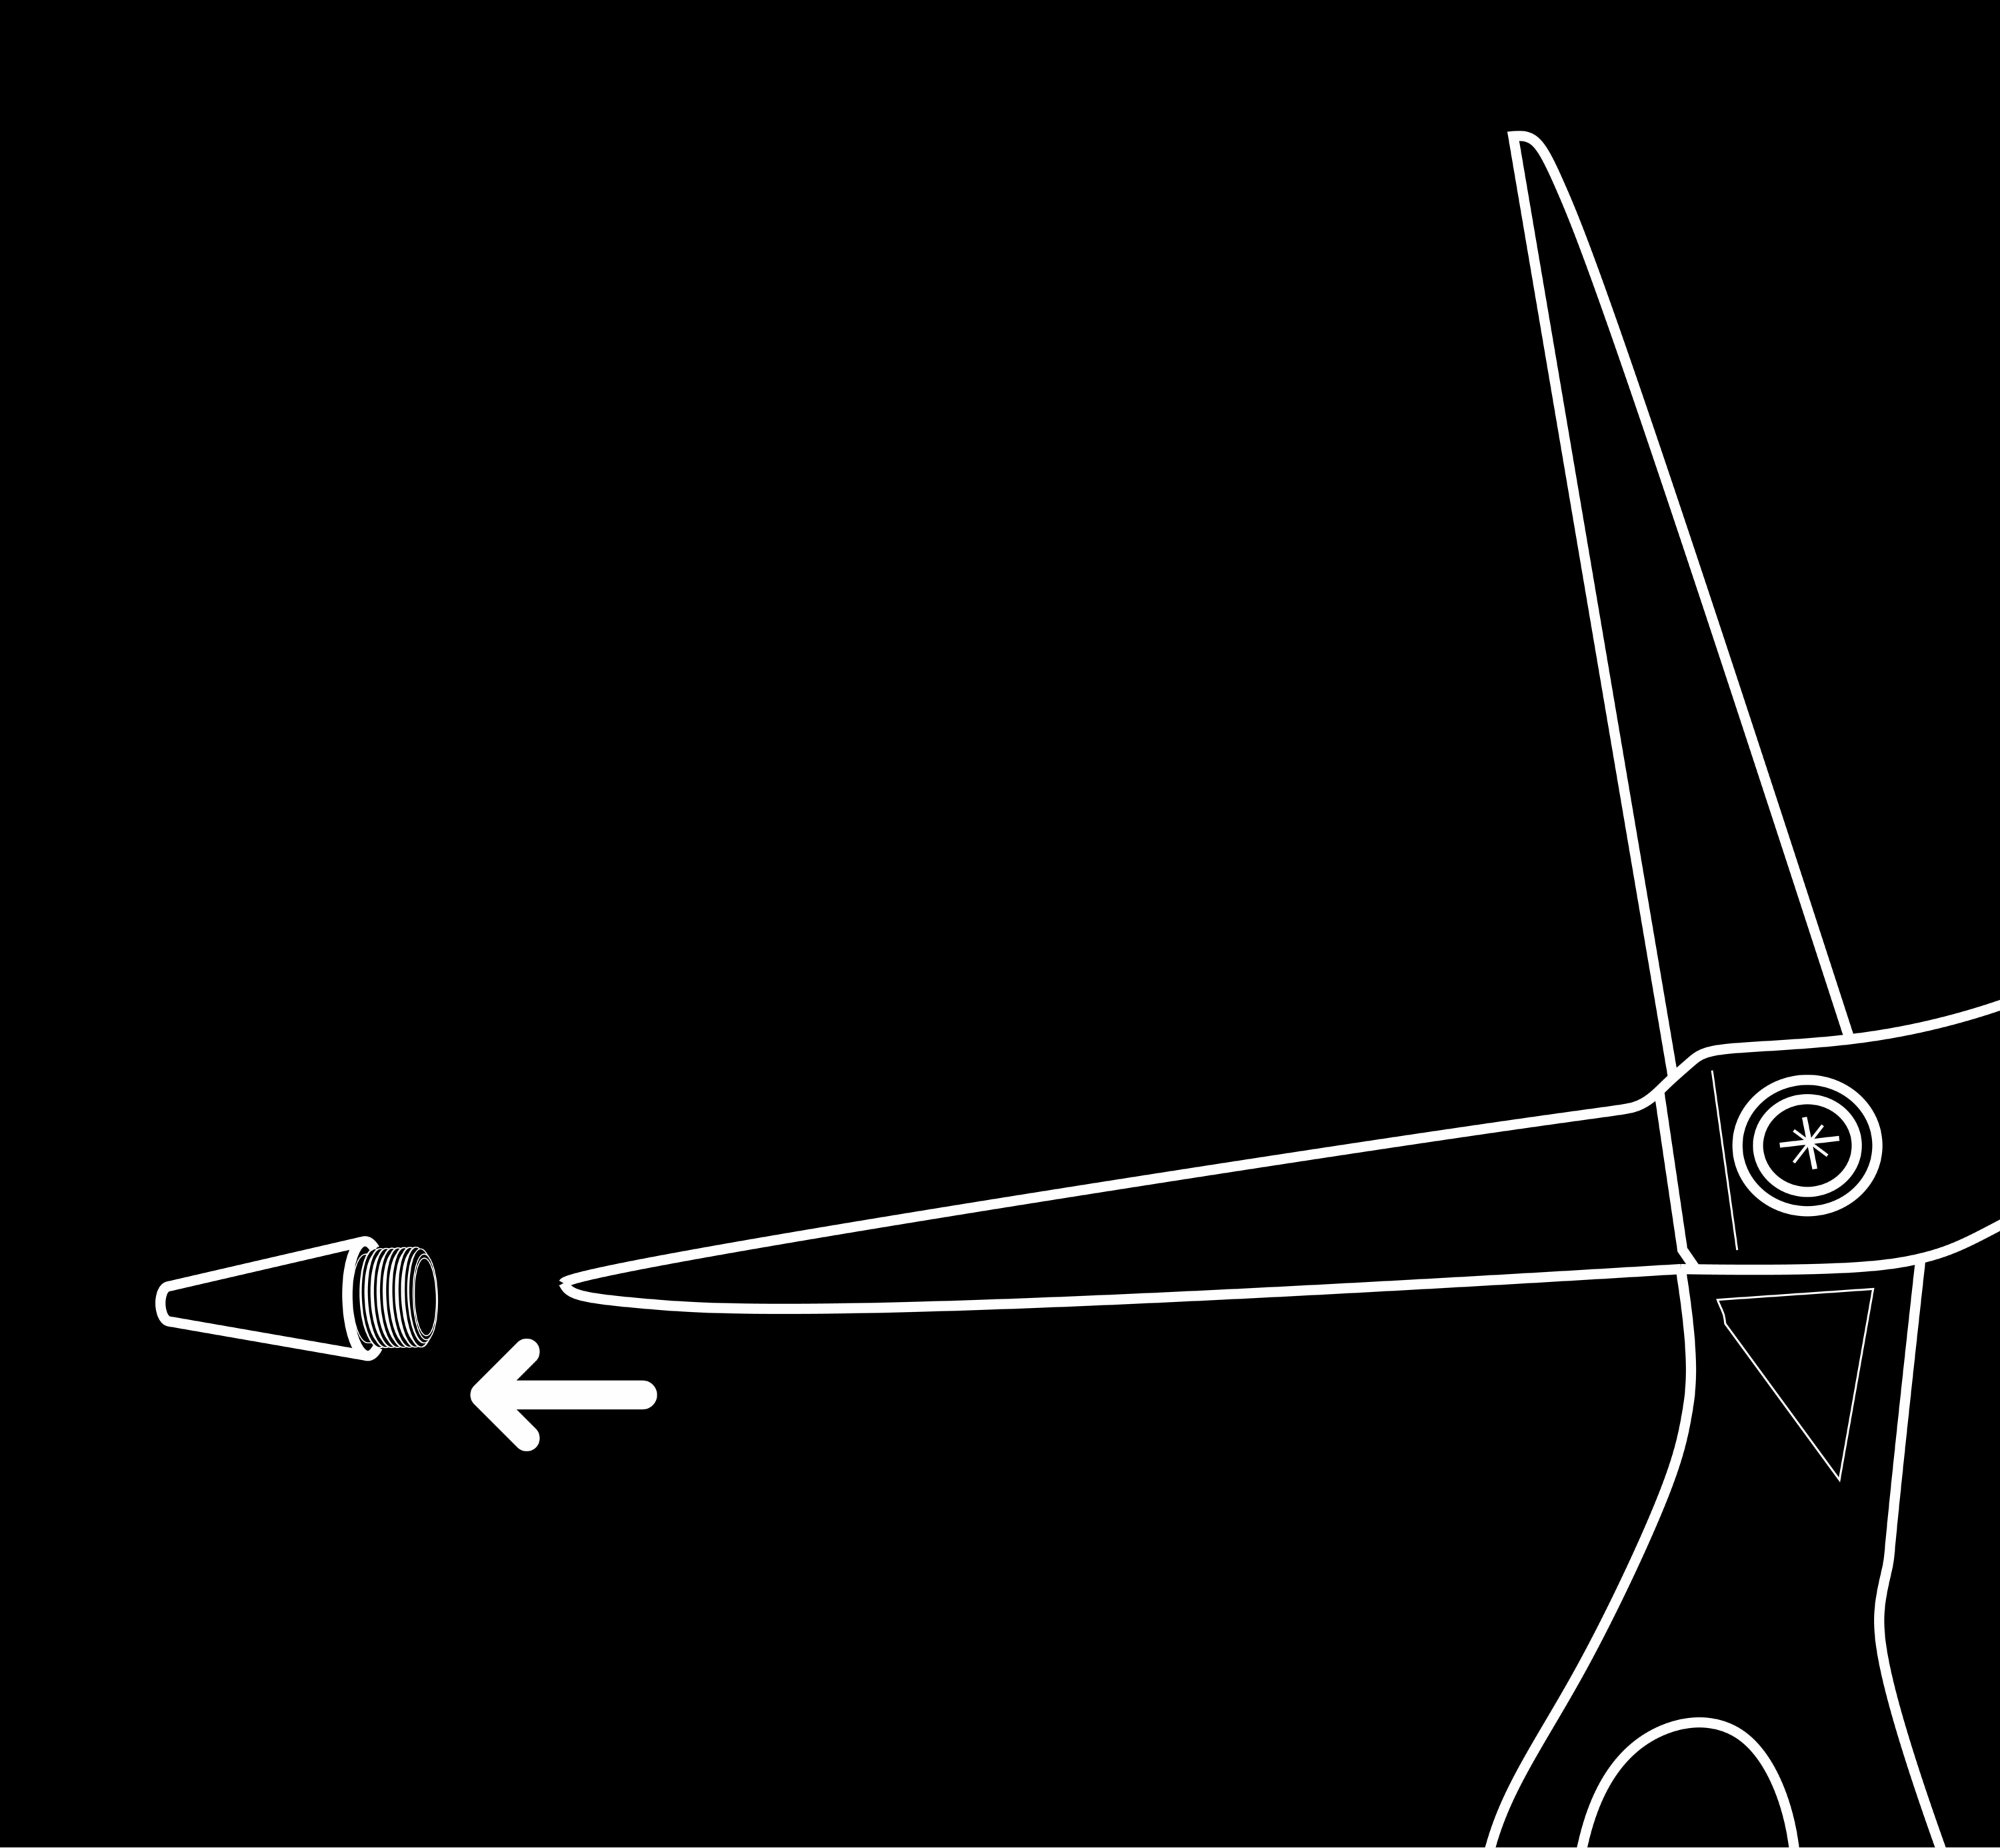
Removing a stuck mechanism cone from inside the pencil cone
1. Carefully insert a single blade of a pair of scissors into the cone
2. Being careful not to slip and cut your finger, hold the pencil cone while applying light pressure into the mechanism cone with the blade of scissors, and rotate the scissor blade counter-clockwise. You should feel the scissors “bite” into the mechanism cone and unscrew it.
3. Re-install the mechanism cone as needed or install a new mechanism into your pencil.
Raw copper and bronze will develop a natural patina over time. Most people appreciate this rustic look, however if you wish to restore your pencil to its original condition you may with the following steps.